> ## Documentation Index
> Fetch the complete documentation index at: https://docs.salescaptain.com/llms.txt
> Use this file to discover all available pages before exploring further.
# Call Flows
> A call flow is the step-by-step path an incoming call follows when it reaches your business. Instead of ringing one phone and hoping someone answers, a call flow ensures every call is handled consistently — whether by routing to the right team, playing an automated message, or capturing a voicemail.
Call flows are crucial because they:
* Reduce missed calls by routing customers to the right person faster.
* Create a streamlined calling experience with greetings and menu options.
* Save time for your team with automations, like voicemail-to-text or SMS follow-ups.
* Ensure 24/7 coverage with rules, forwarding, or AI Agent assistance.
With SalesCaptain’s drag-and-drop builder, you can customize call flows to match your exact business needs.
## Getting Started
There are **four** primary elements to the call flow builder that are essential to know about if you want to set up the perfect call flow.
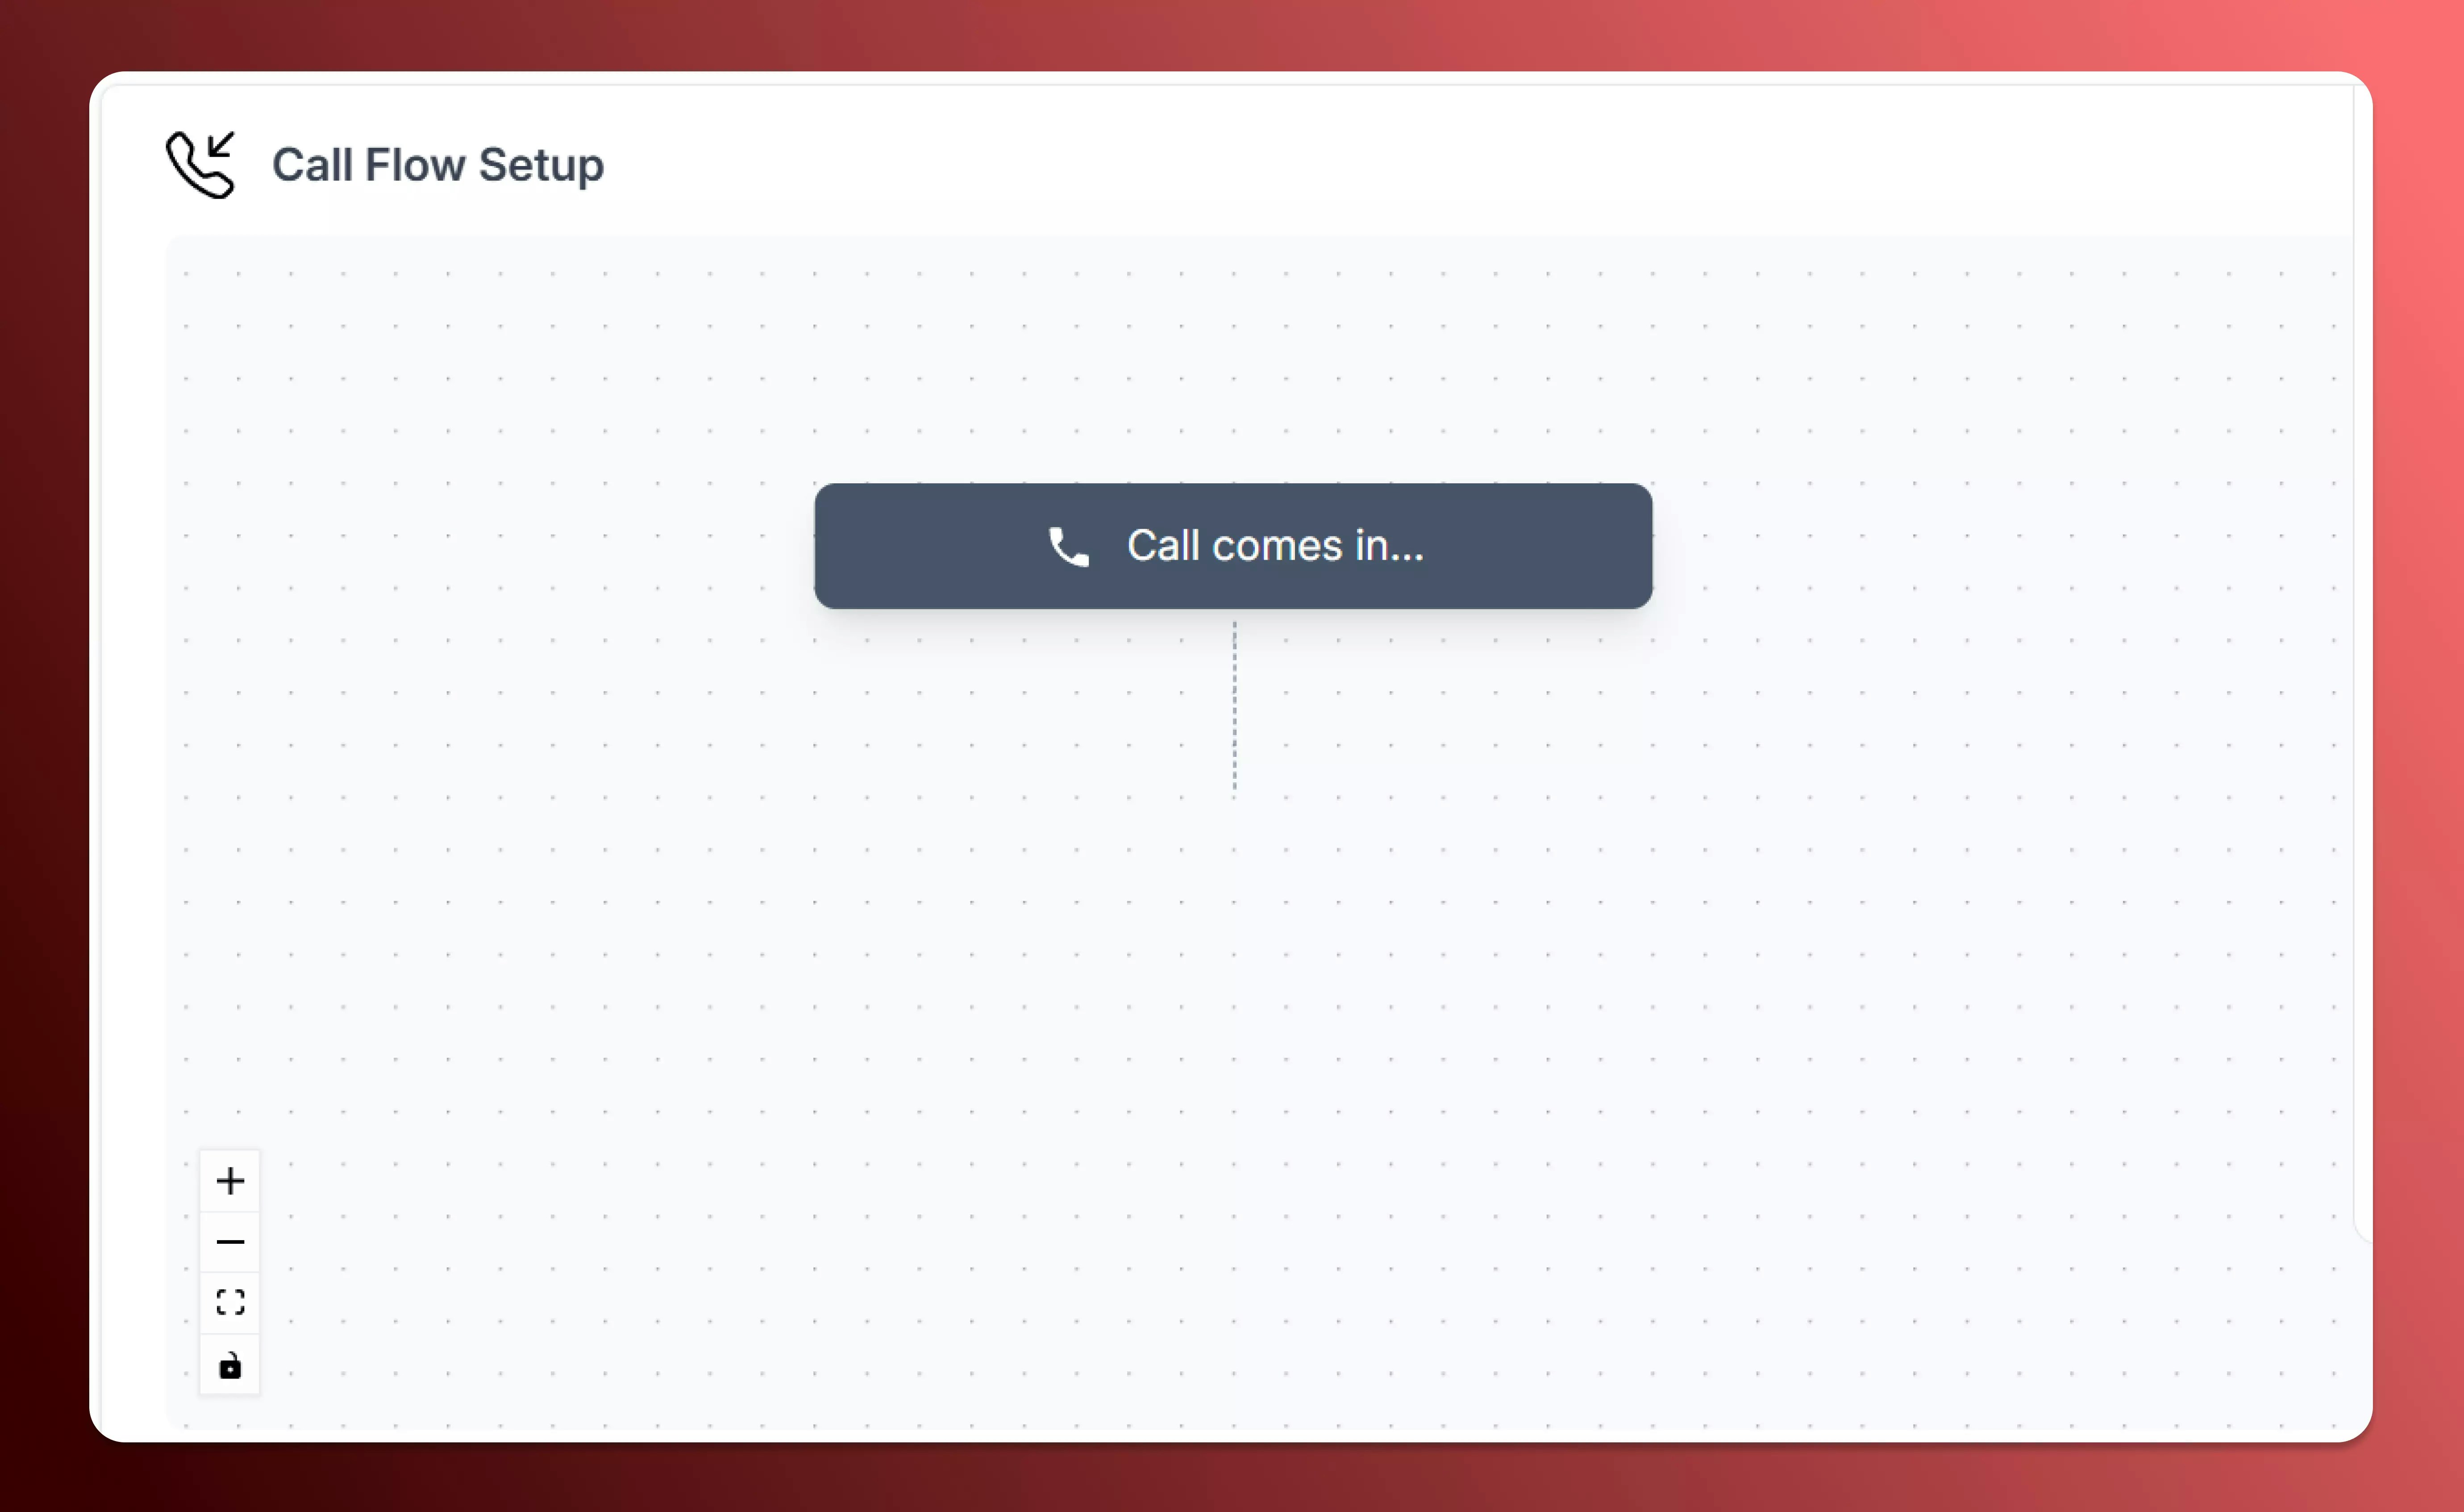
1. **Canvas:**
The primary workspace where you arrange elements in order to direct your incoming calls to the right places.
Use the controls on the left corner to zoom in, zoom out, view your entire call flow at once, and toggle interactivity of elements.
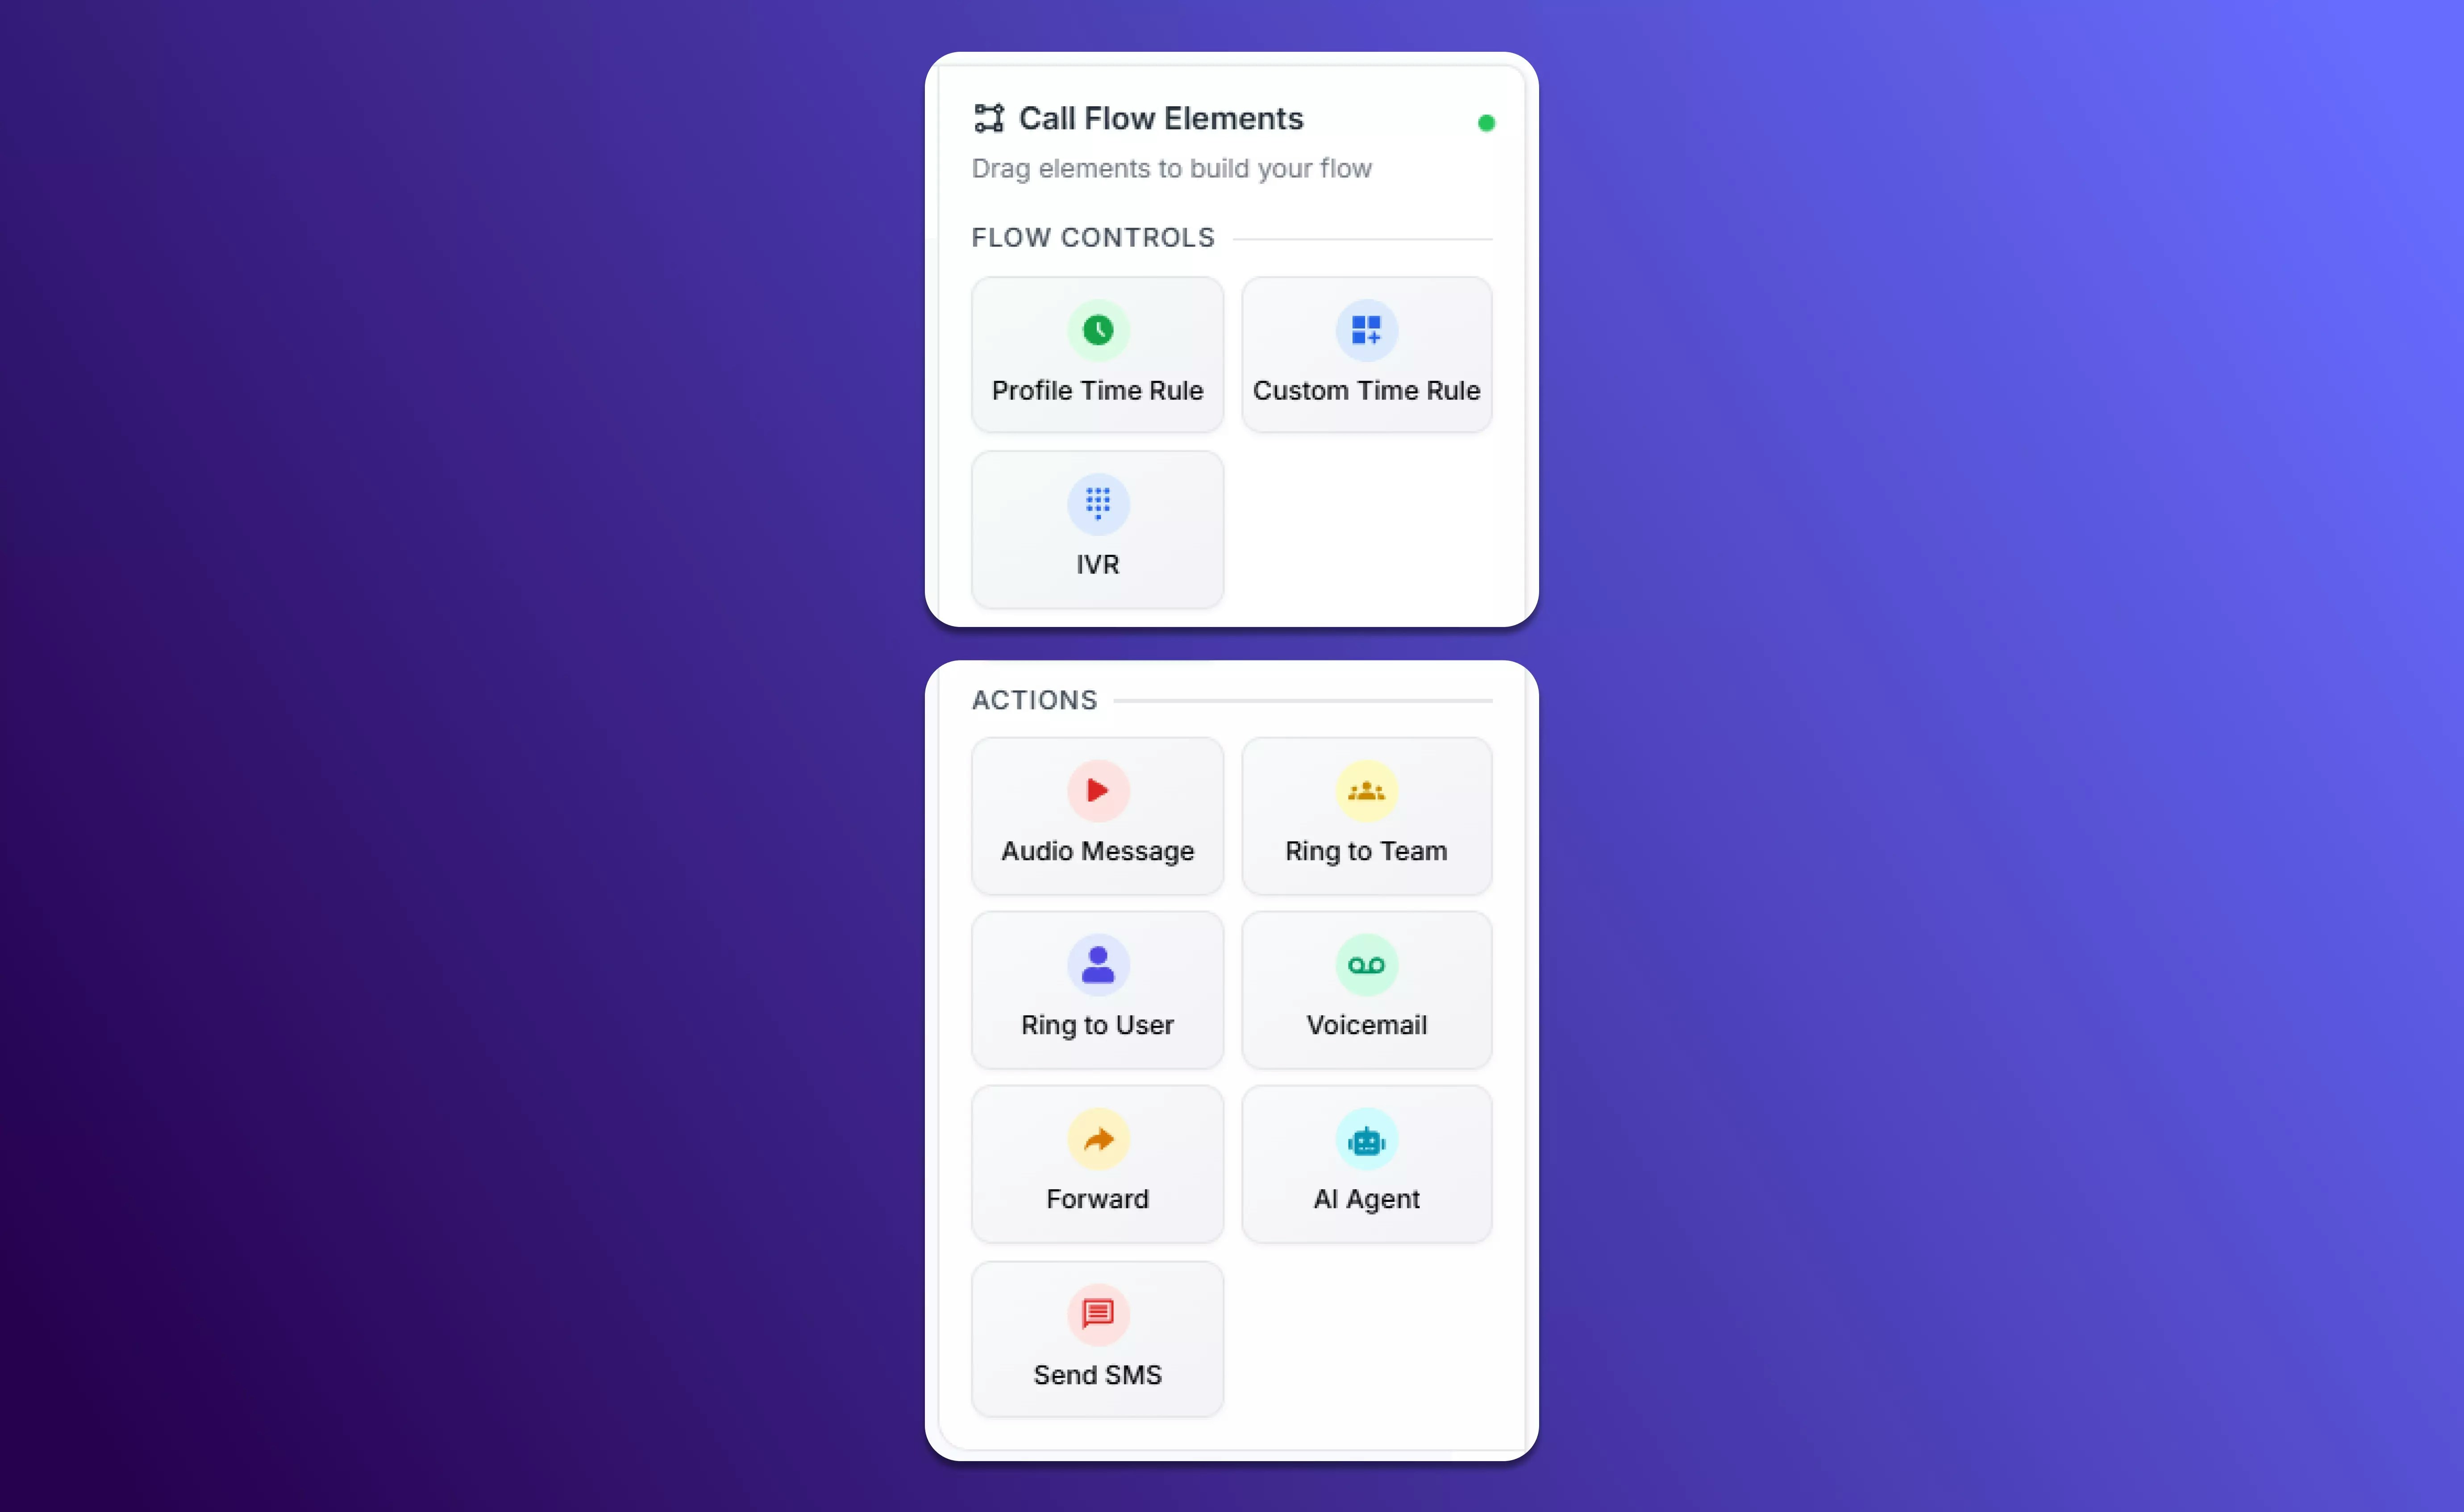
 2. **Call Flow Elements:**
The available elements you can implement within your call flow to trigger certain actions; such as playing an audio message, implementing a time rule, or directing the call to a particular user or team.
2. **Call Flow Elements:**
The available elements you can implement within your call flow to trigger certain actions; such as playing an audio message, implementing a time rule, or directing the call to a particular user or team.
 3. **Connecting Lines:**
The dotted lines that indicate which elements are connected and what actions will be triggered next.
3. **Connecting Lines:**
The dotted lines that indicate which elements are connected and what actions will be triggered next.
 The flow is organized from top to bottom, beginning with the incoming call, and the call flow can have as many or as few elements as you would like.
4. **Element Configuration:**
Selecting an element placed on the canvas will allow you to configure and direct it to the right place.
This screen offers different options for each element. For example, the configuration menu for the element ‘**Ring to Team**’ will allow you to select the team you would like to direct to, and the duration for which you want their phone to ring.
The flow is organized from top to bottom, beginning with the incoming call, and the call flow can have as many or as few elements as you would like.
4. **Element Configuration:**
Selecting an element placed on the canvas will allow you to configure and direct it to the right place.
This screen offers different options for each element. For example, the configuration menu for the element ‘**Ring to Team**’ will allow you to select the team you would like to direct to, and the duration for which you want their phone to ring.
 ## Setting Up Call Flows
1. From your **primary sidebar**, navigate to **Captain Labs**.
## Setting Up Call Flows
1. From your **primary sidebar**, navigate to **Captain Labs**.
 2. Select **Call Flows**, then click **Create New Call Flow**.
3. Here, you will have the option to name your call flow and select which number(s) you would like to apply it to.
2. Select **Call Flows**, then click **Create New Call Flow**.
3. Here, you will have the option to name your call flow and select which number(s) you would like to apply it to.
 4. Once you have named your call flow and assigned it to certain number(s), you can now start building. Drag and drop actions (like IVR menus, voicemail, or AI Agent routing) from the right-hand panel into the workspace.
 5. Customize your flow with prerecorded audio messages, time-based routing rules, or AI Agents trained on your knowledge base.
6. Once you’re satisfied, click **Save & Activate** to put your call flow into action.
5. Customize your flow with prerecorded audio messages, time-based routing rules, or AI Agents trained on your knowledge base.
6. Once you’re satisfied, click **Save & Activate** to put your call flow into action.
 ## Call Flow Elements
The following are the building blocks you can use in your call flows:
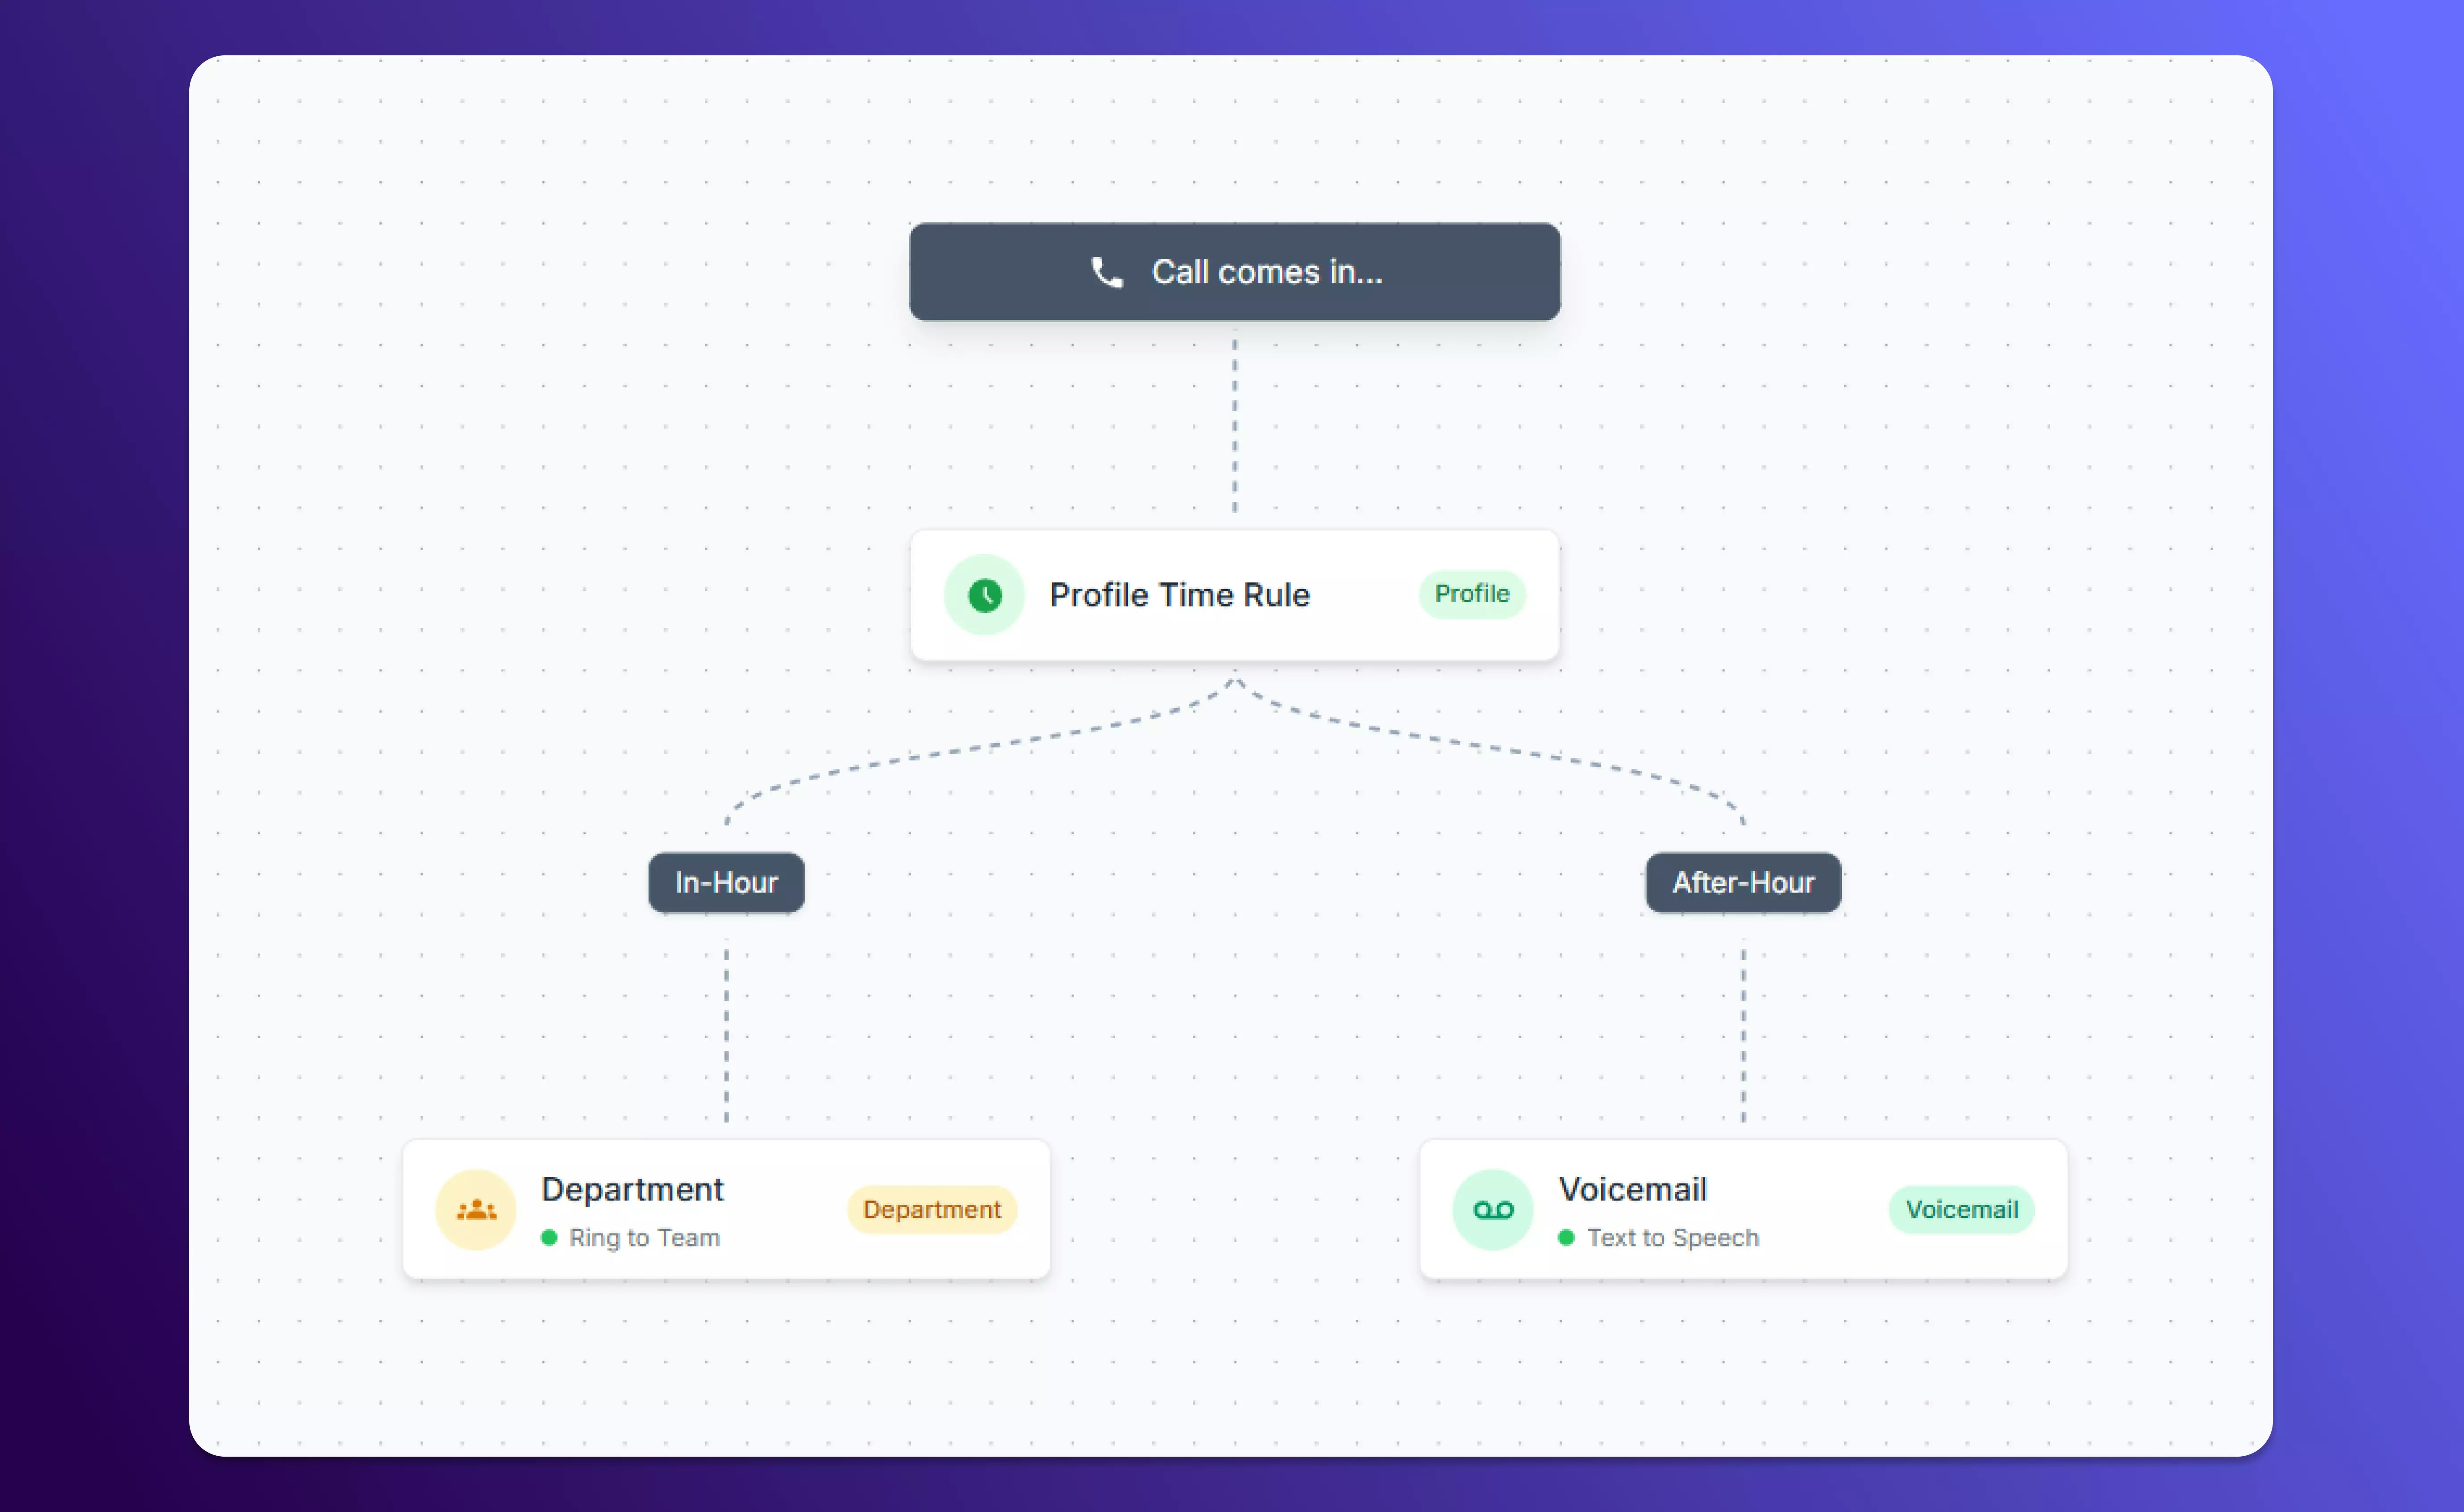
### Profile Time Rules
* Define how calls should be routed **during business hours** vs. **after hours**.
* Configure the In-Hours and After-Hours timings for your business by navigating to **Settings -> Business Profile -> Business Hours.**
* *Example*: Send calls to your front desk during the day, and to voicemail after hours.
## Call Flow Elements
The following are the building blocks you can use in your call flows:
### Profile Time Rules
* Define how calls should be routed **during business hours** vs. **after hours**.
* Configure the In-Hours and After-Hours timings for your business by navigating to **Settings -> Business Profile -> Business Hours.**
* *Example*: Send calls to your front desk during the day, and to voicemail after hours.
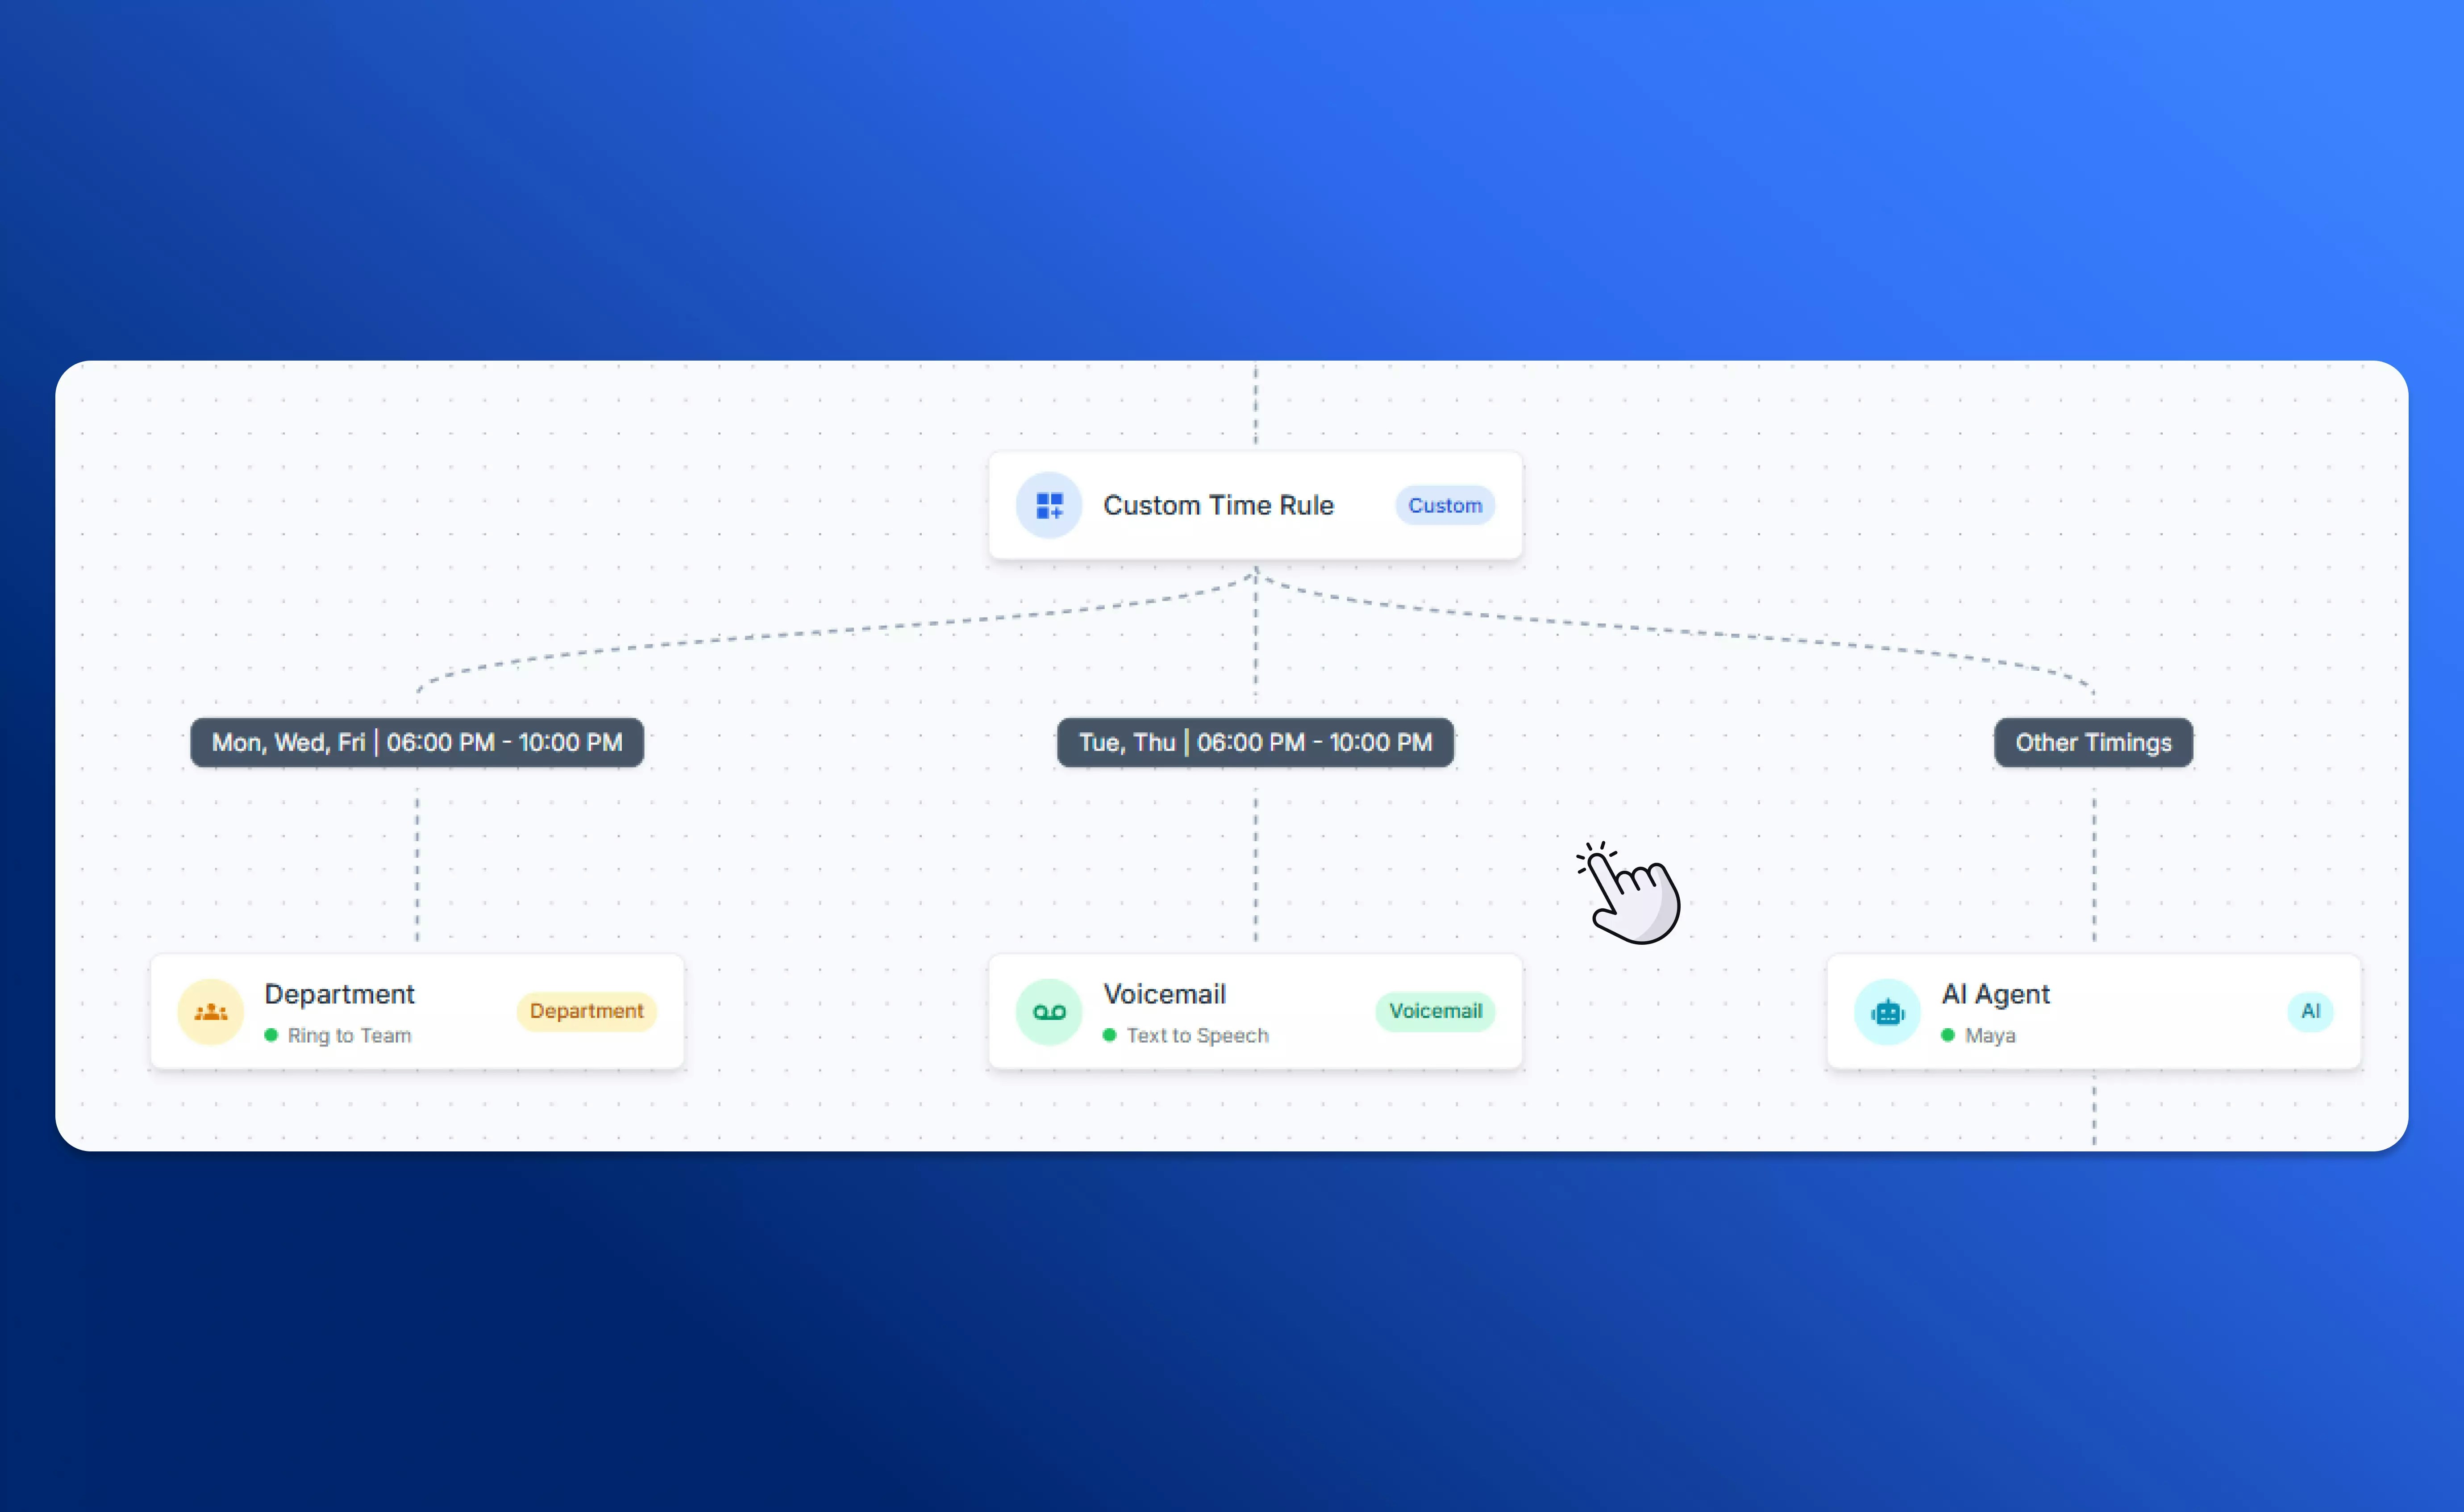
 ### Custom Time Rules
* Set up your custom rule in the element configuration screen by choosing the days of the week and hours of the day that you want the rule to apply, and select ‘**Add New Rule**’.
* *Example*: Route calls to one team on Mondays, another on weekends, or set different rules for holidays.
### Custom Time Rules
* Set up your custom rule in the element configuration screen by choosing the days of the week and hours of the day that you want the rule to apply, and select ‘**Add New Rule**’.
* *Example*: Route calls to one team on Mondays, another on weekends, or set different rules for holidays.
 * Once added, you will be able to see your custom time rules on the canvas.
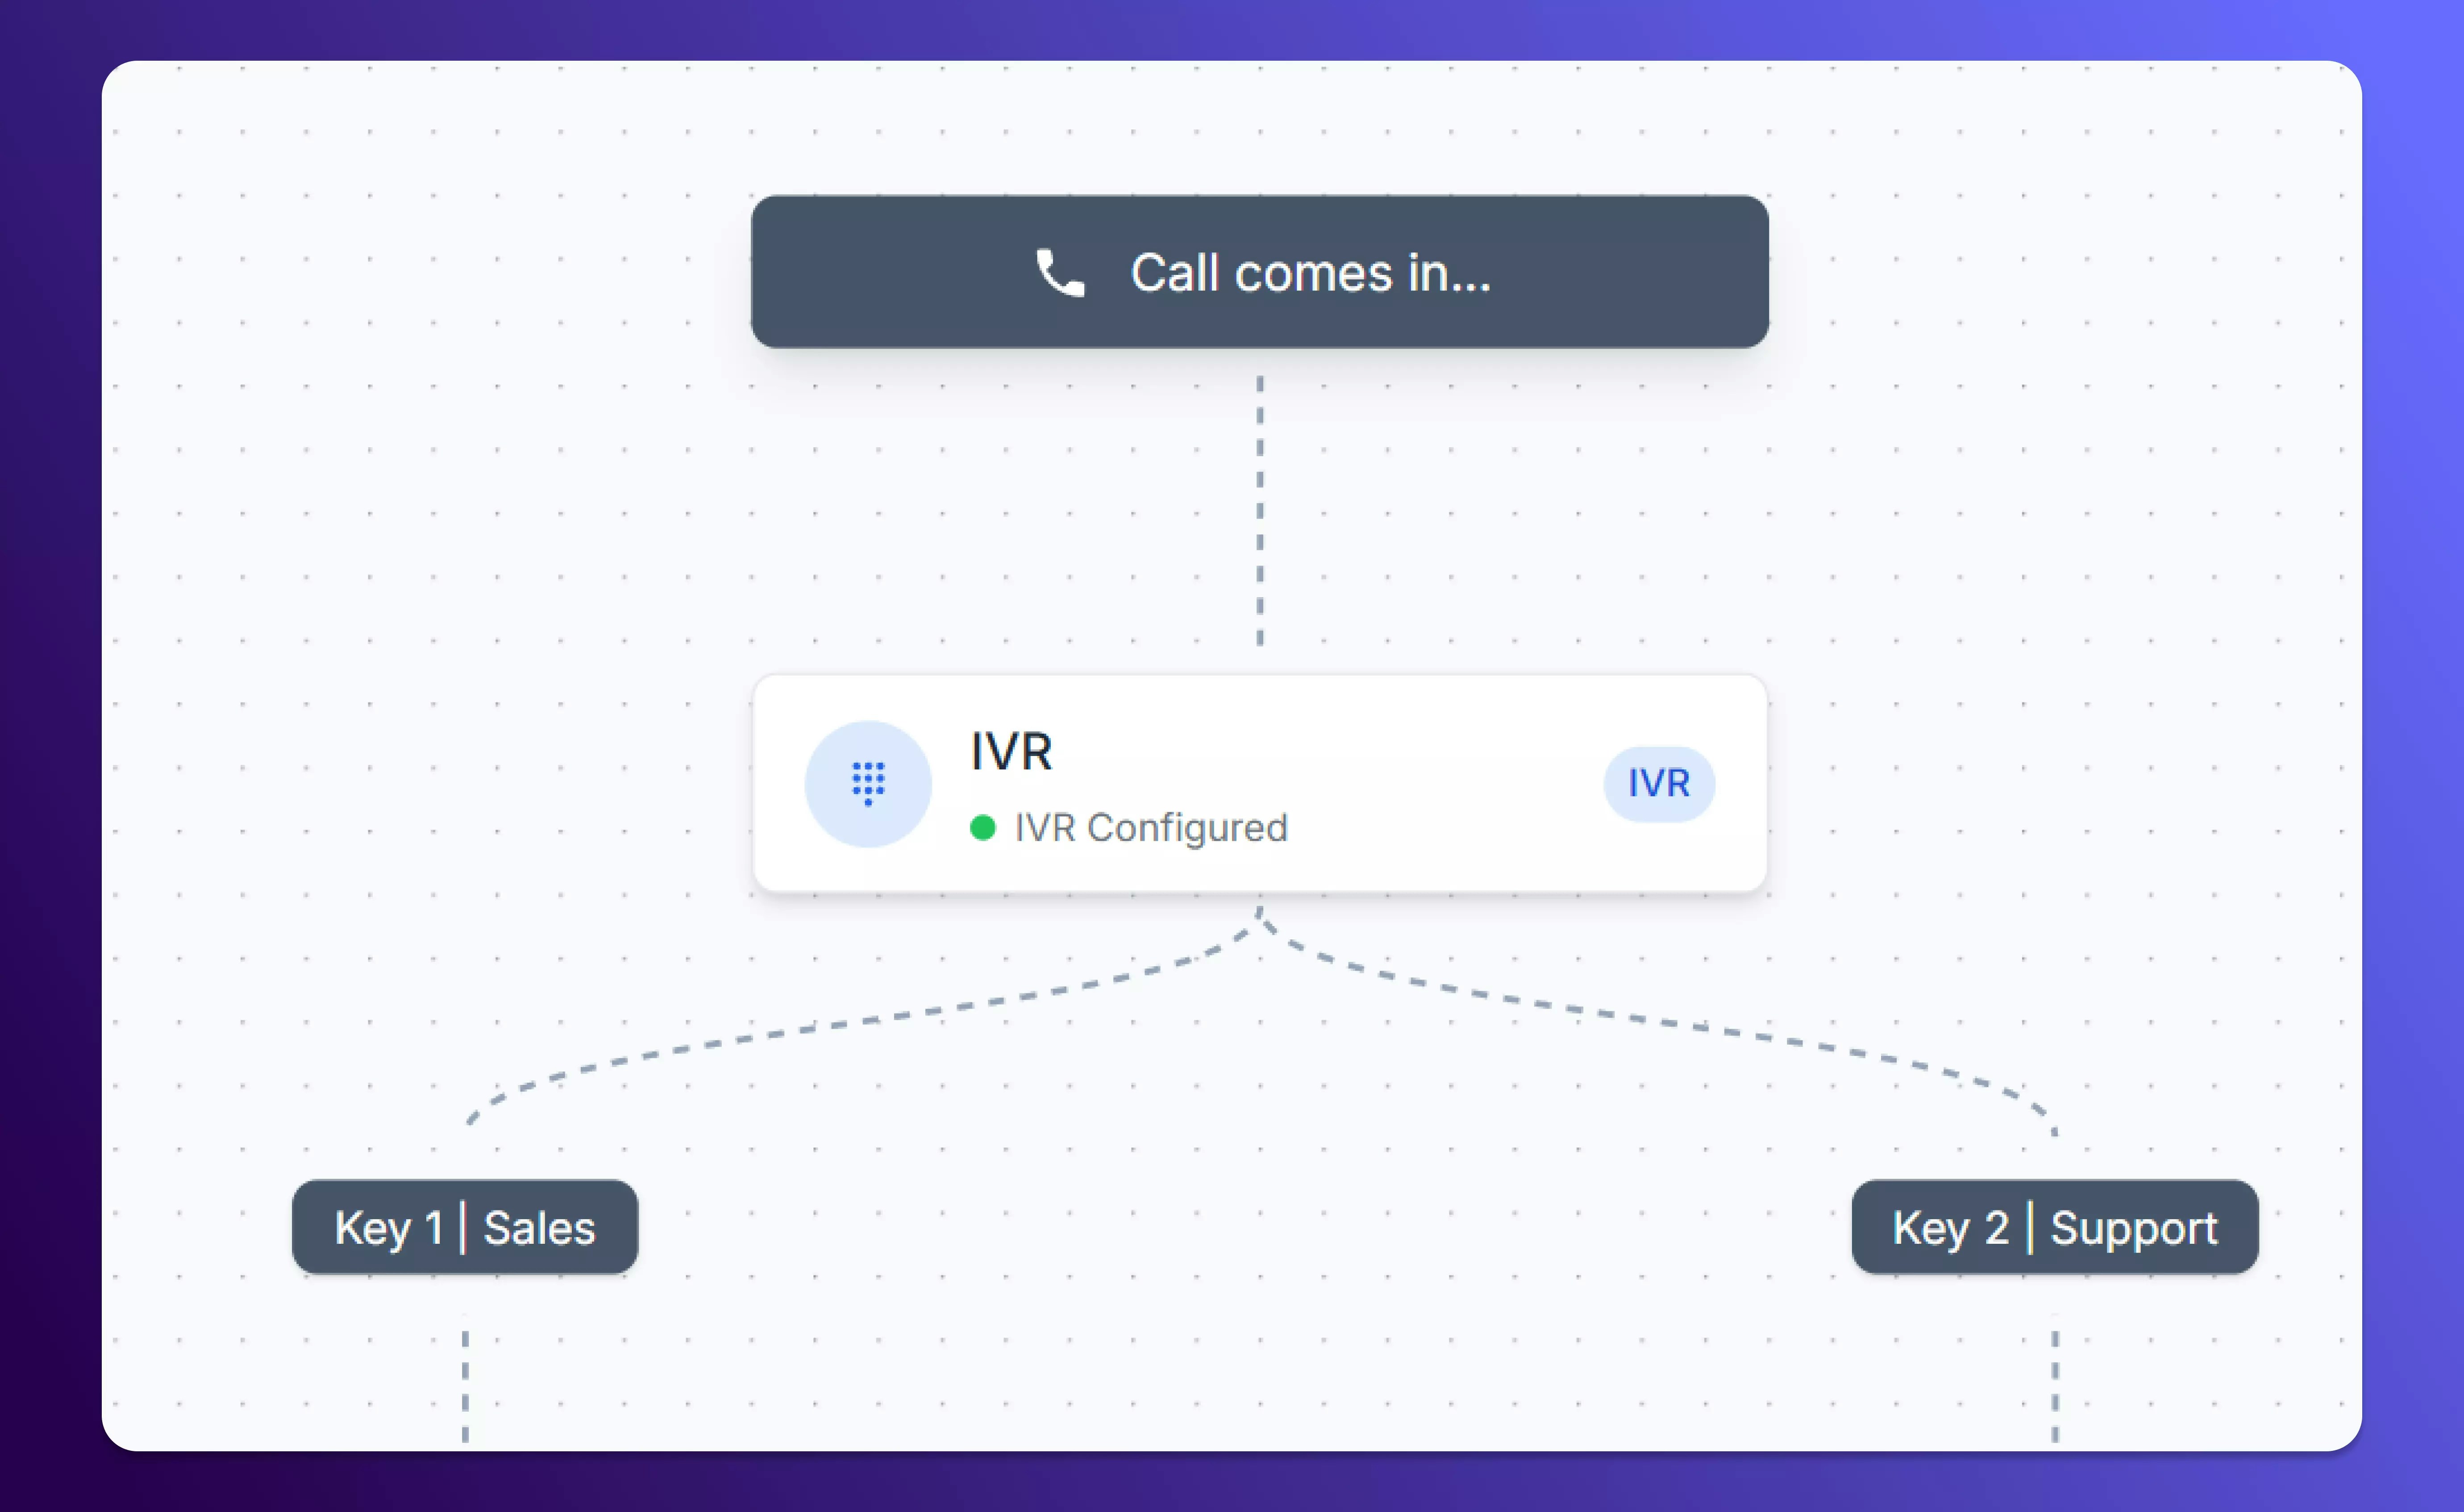
 ### IVR (Interactive Voice Response)
* Set up menu options so callers can self-direct to the right team or department instantly.
* Enable text and audio messages, configure keys, disable keys, and more in the element configuration menu.
### IVR (Interactive Voice Response)
* Set up menu options so callers can self-direct to the right team or department instantly.
* Enable text and audio messages, configure keys, disable keys, and more in the element configuration menu.
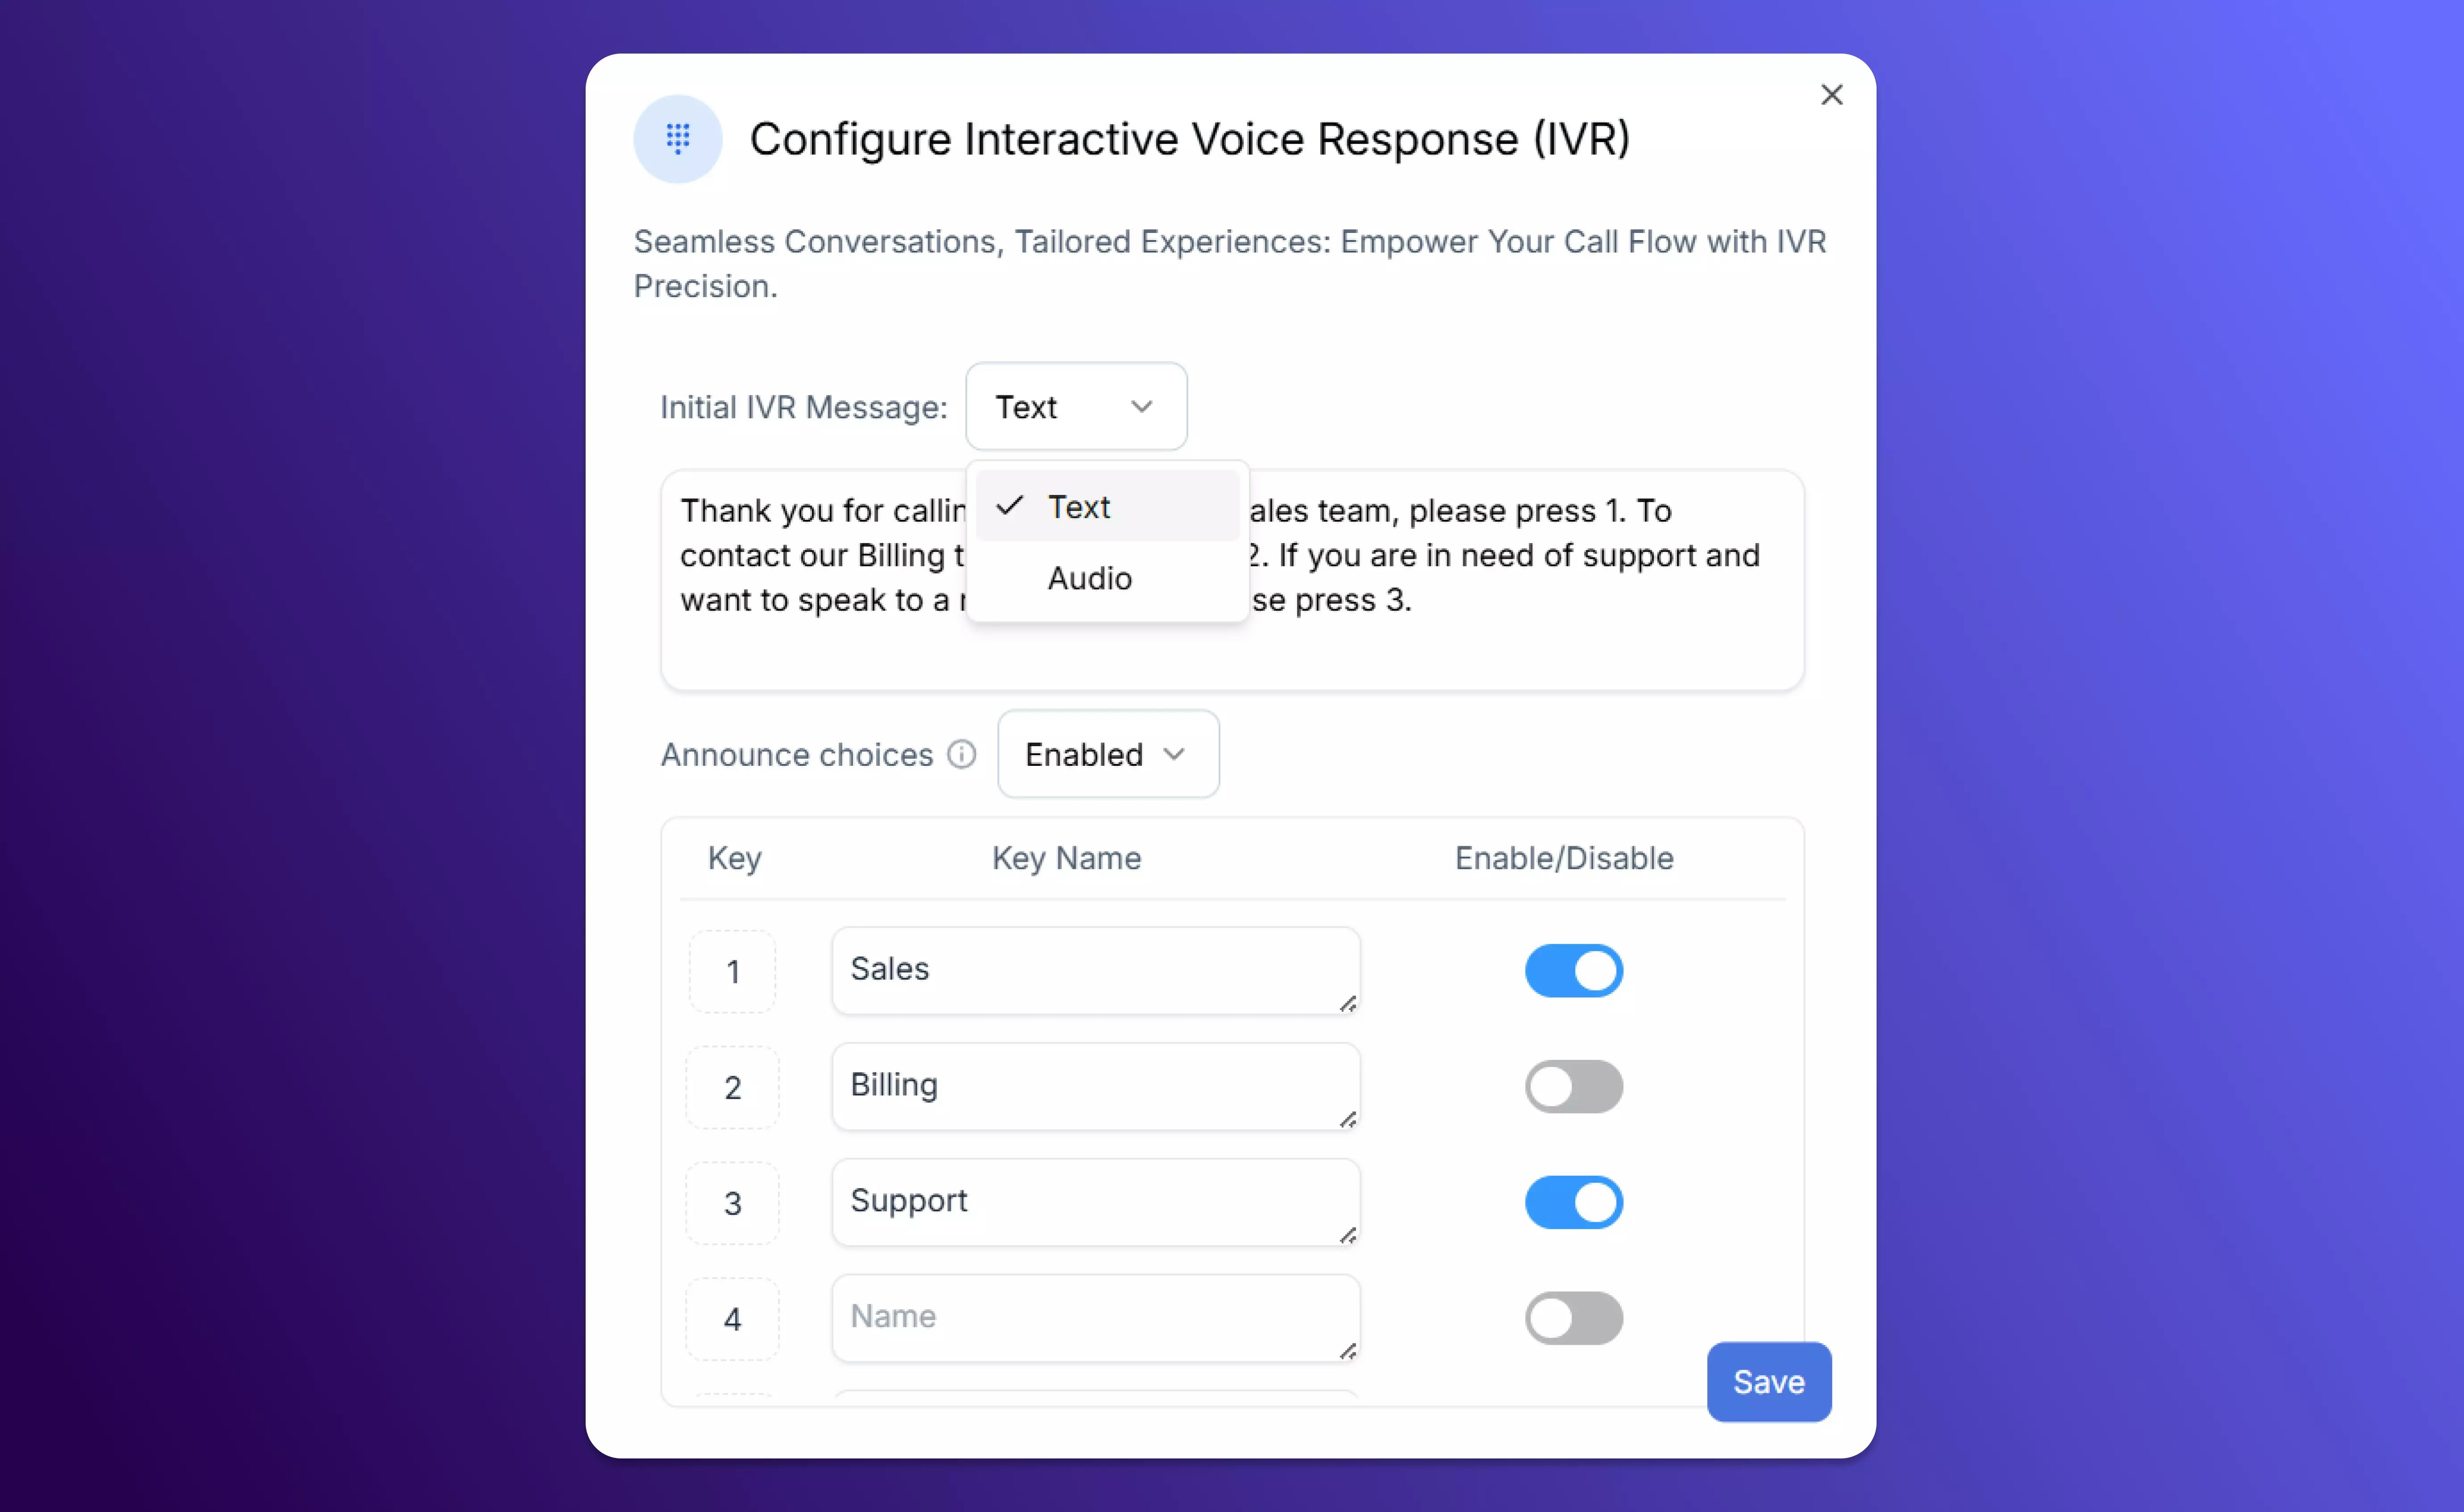 * *Example*: “Press 1 for Sales, Press 2 for Support.”
 ### Audio Message
* Play a voice message before routing a call.
* Supports **text-to-speech** or custom **MP3 uploads**.
* *Example*: “Thanks for calling. Your call may be recorded for quality purposes.”
### Audio Message
* Play a voice message before routing a call.
* Supports **text-to-speech** or custom **MP3 uploads**.
* *Example*: “Thanks for calling. Your call may be recorded for quality purposes.”
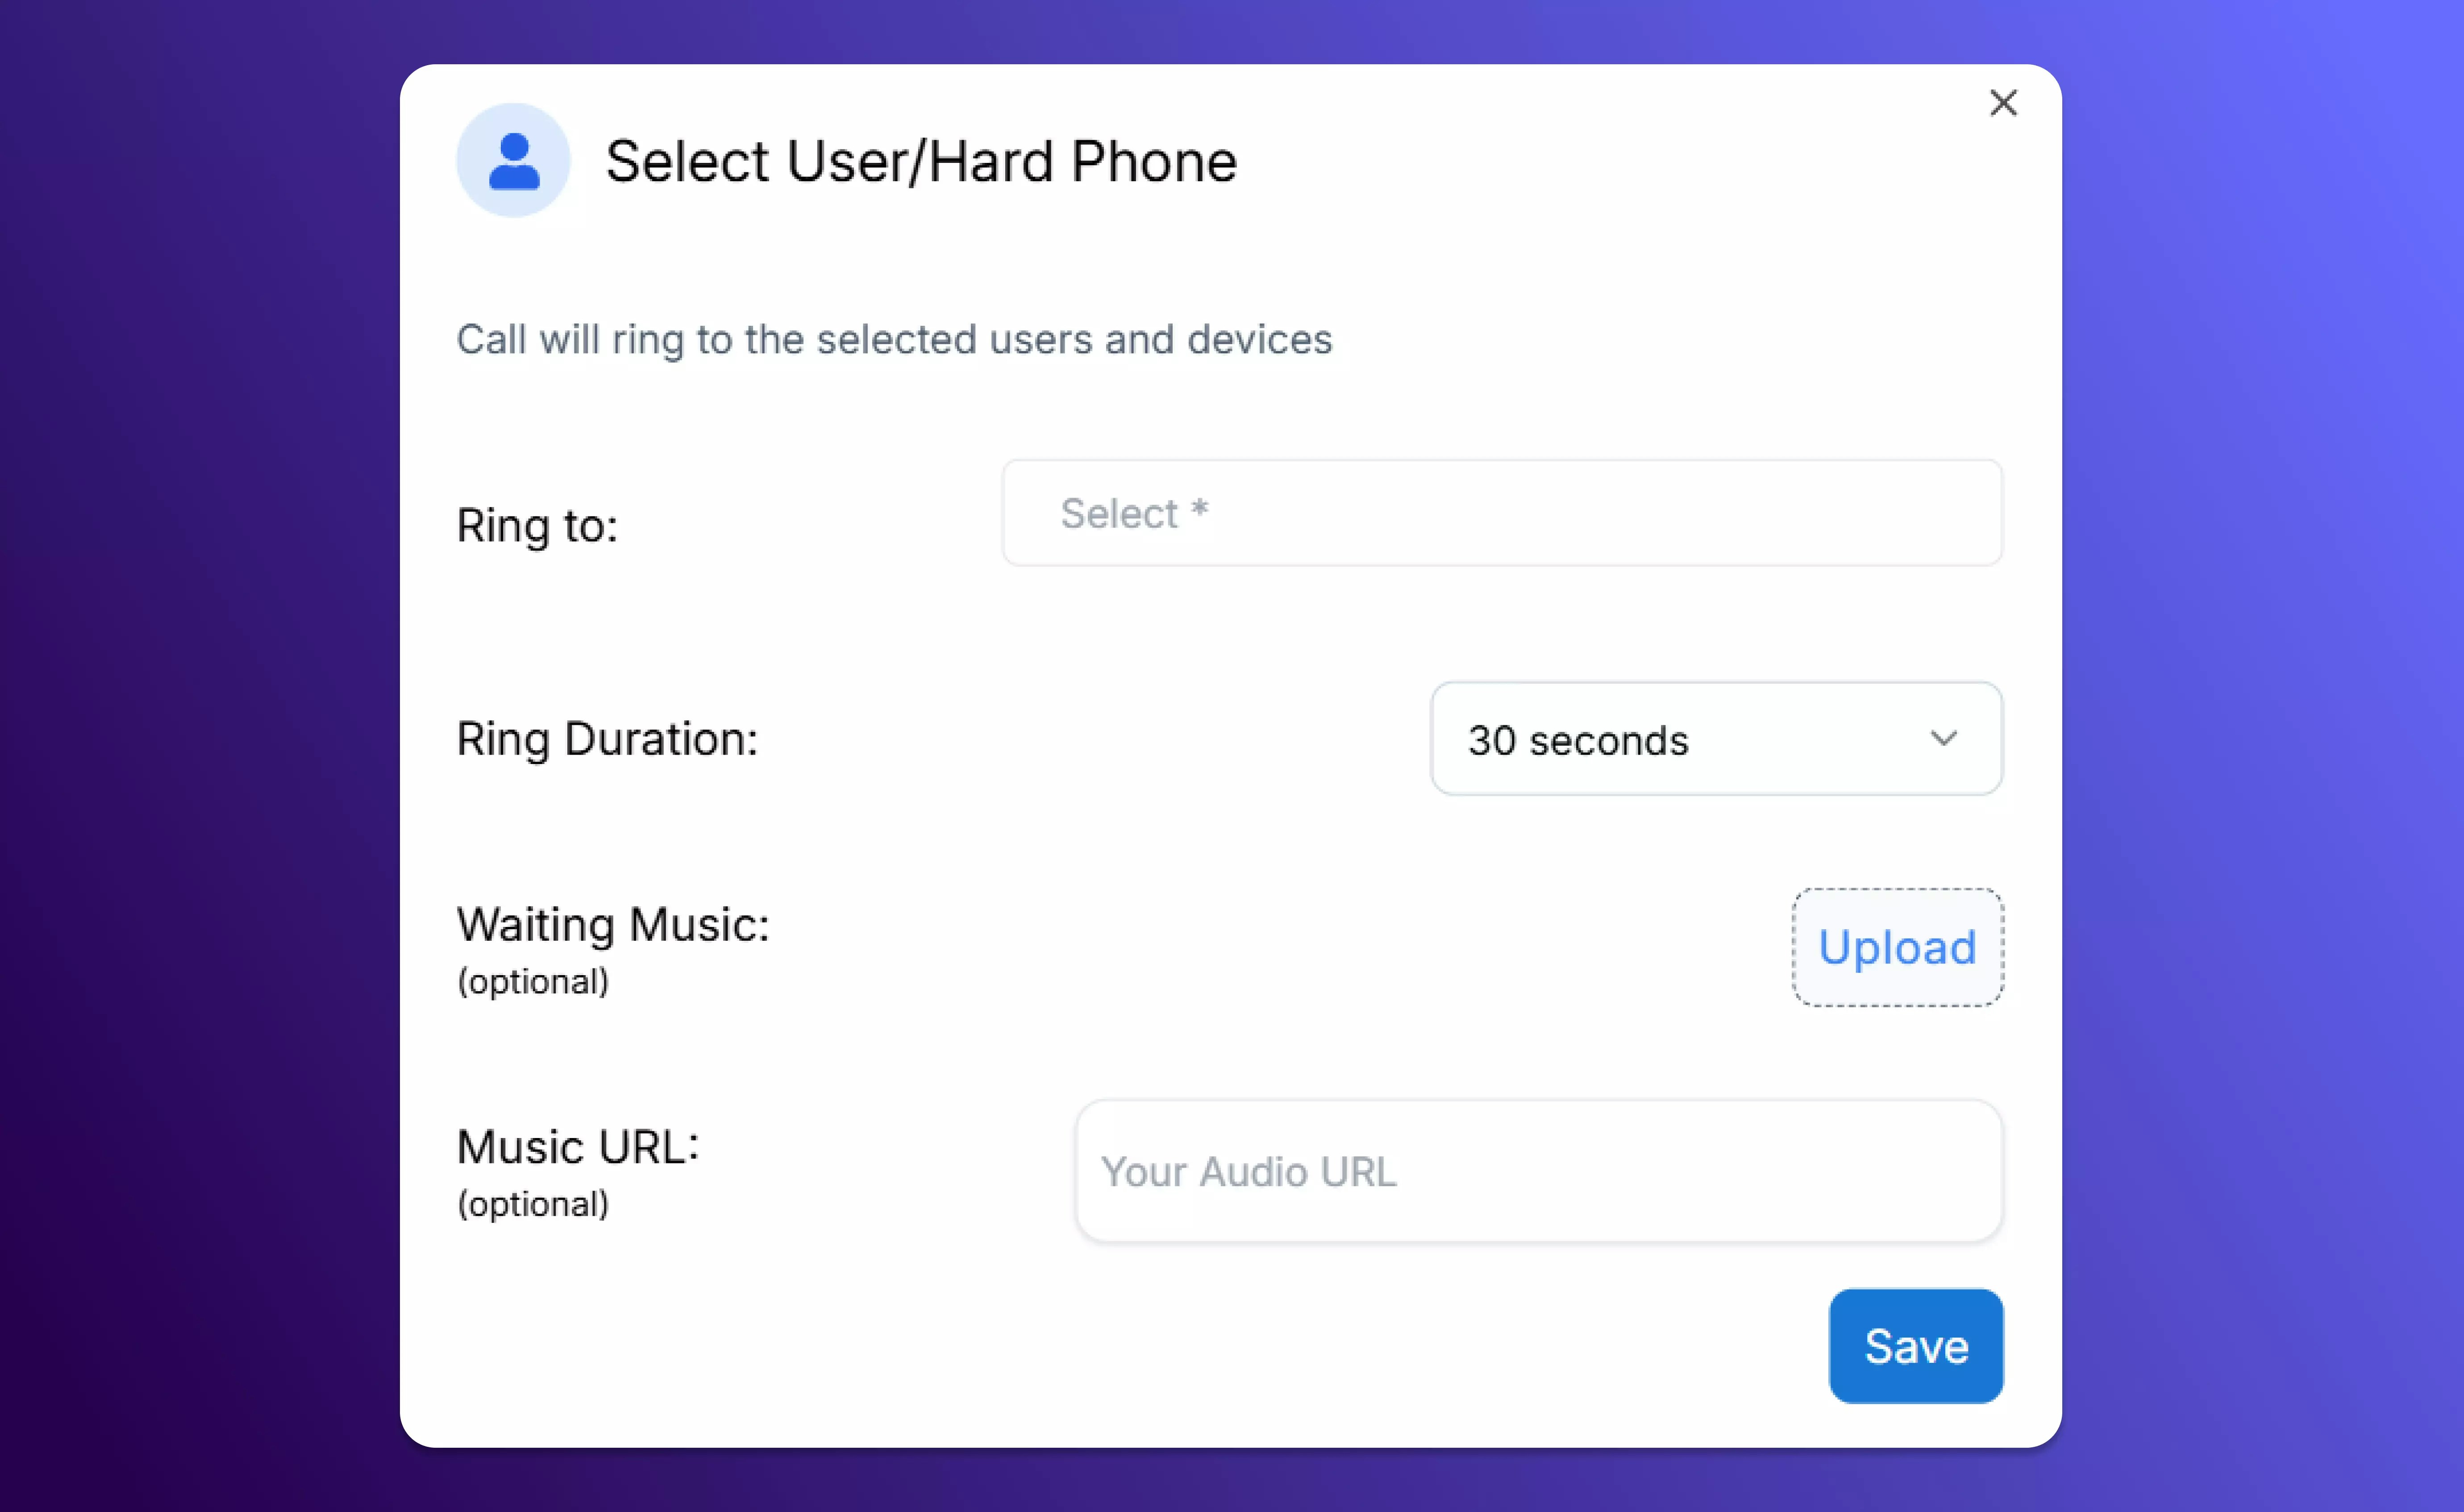
 ### Ring to User
* Send calls directly to one or more team members.
* If unanswered, you can forward the call to another user, team, or action.
### Ring to User
* Send calls directly to one or more team members.
* If unanswered, you can forward the call to another user, team, or action.
 ### Voicemail
* Capture messages when no one is available.
* You can add custom audio greetings via Mp3 file or text-to-speech right before the beep.
### Voicemail
* Capture messages when no one is available.
* You can add custom audio greetings via Mp3 file or text-to-speech right before the beep.
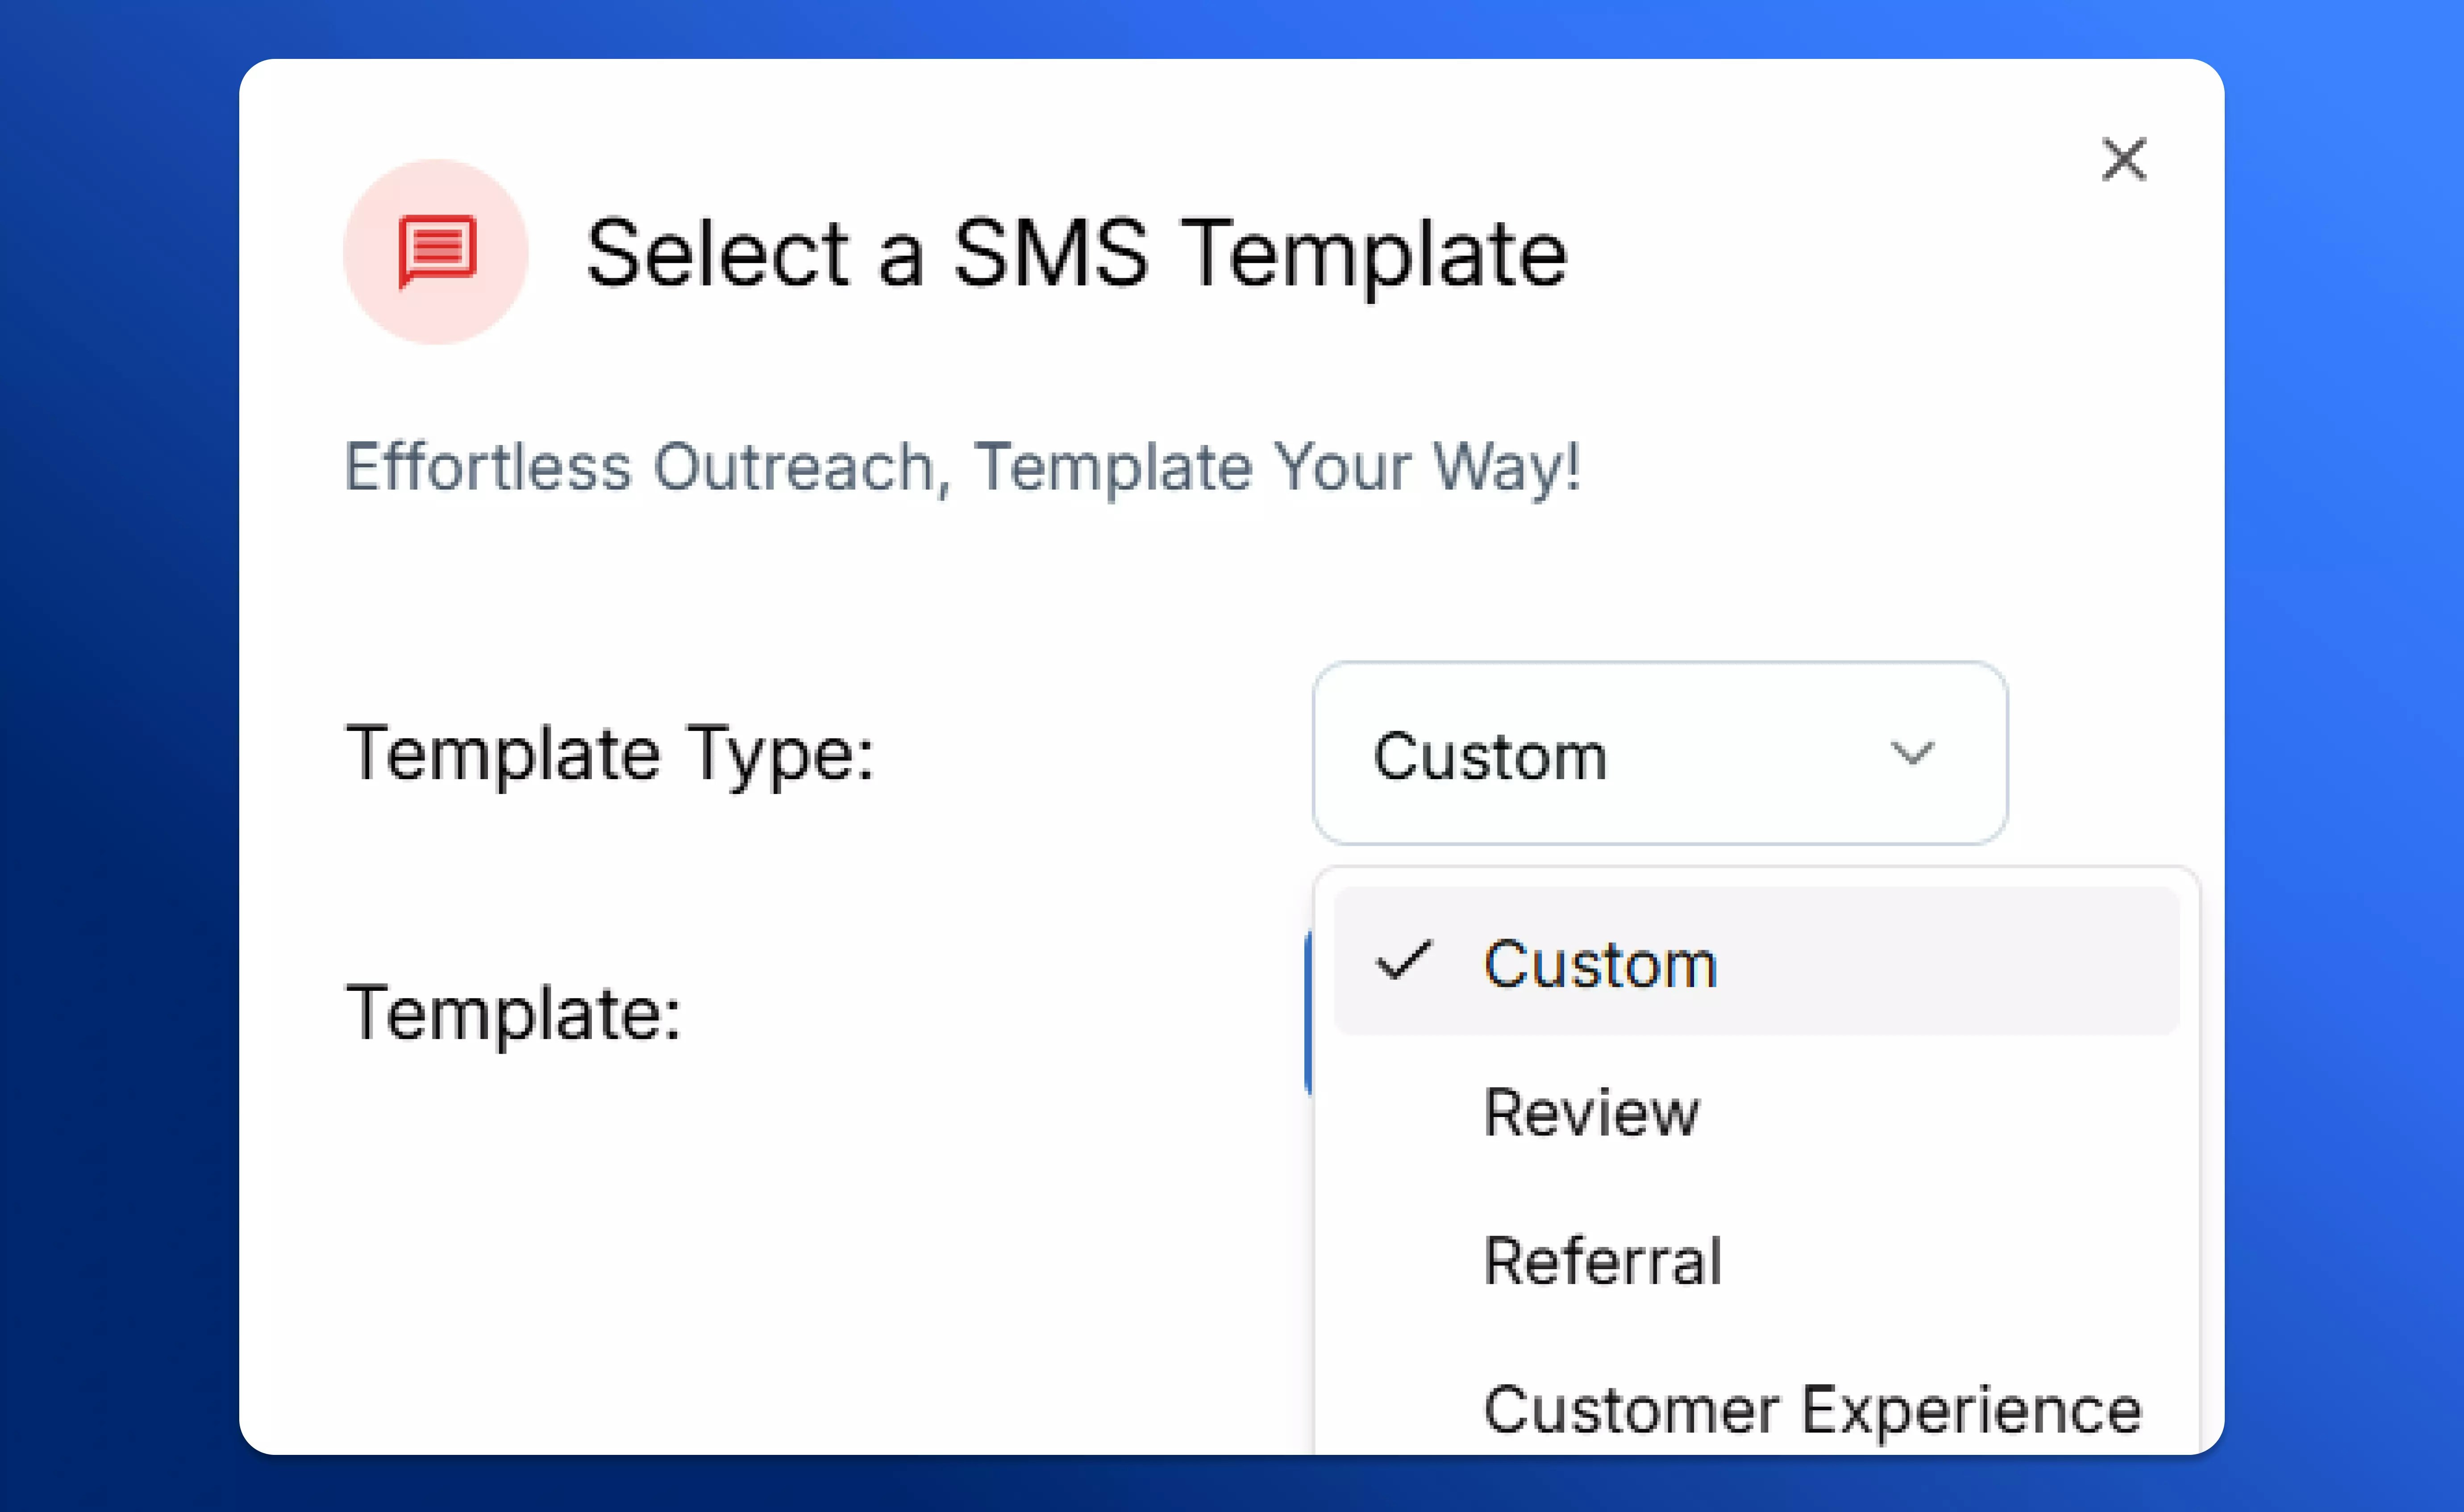
 ### Send SMS
* Automatically send a follow-up text message after a voicemail.
* Choose from a variety of pre-made templates for different situations, or customise your own SMS templates.
* *Example*: “Hi @contact\_first\_name, Thanks for choosing our business. Please provide your feedback by clicking the link below"
### Send SMS
* Automatically send a follow-up text message after a voicemail.
* Choose from a variety of pre-made templates for different situations, or customise your own SMS templates.
* *Example*: “Hi @contact\_first\_name, Thanks for choosing our business. Please provide your feedback by clicking the link below"
 ### AI Agent
* Route calls to an **AI-powered voice agent** that can answer questions, capture information, or escalate to a human when needed.
* Train AI Agents on your own data, and customize to fit your industry and unique service profile.
* Learn more about creating and deploying AI Agents.
### AI Agent
* Route calls to an **AI-powered voice agent** that can answer questions, capture information, or escalate to a human when needed.
* Train AI Agents on your own data, and customize to fit your industry and unique service profile.
* Learn more about creating and deploying AI Agents.
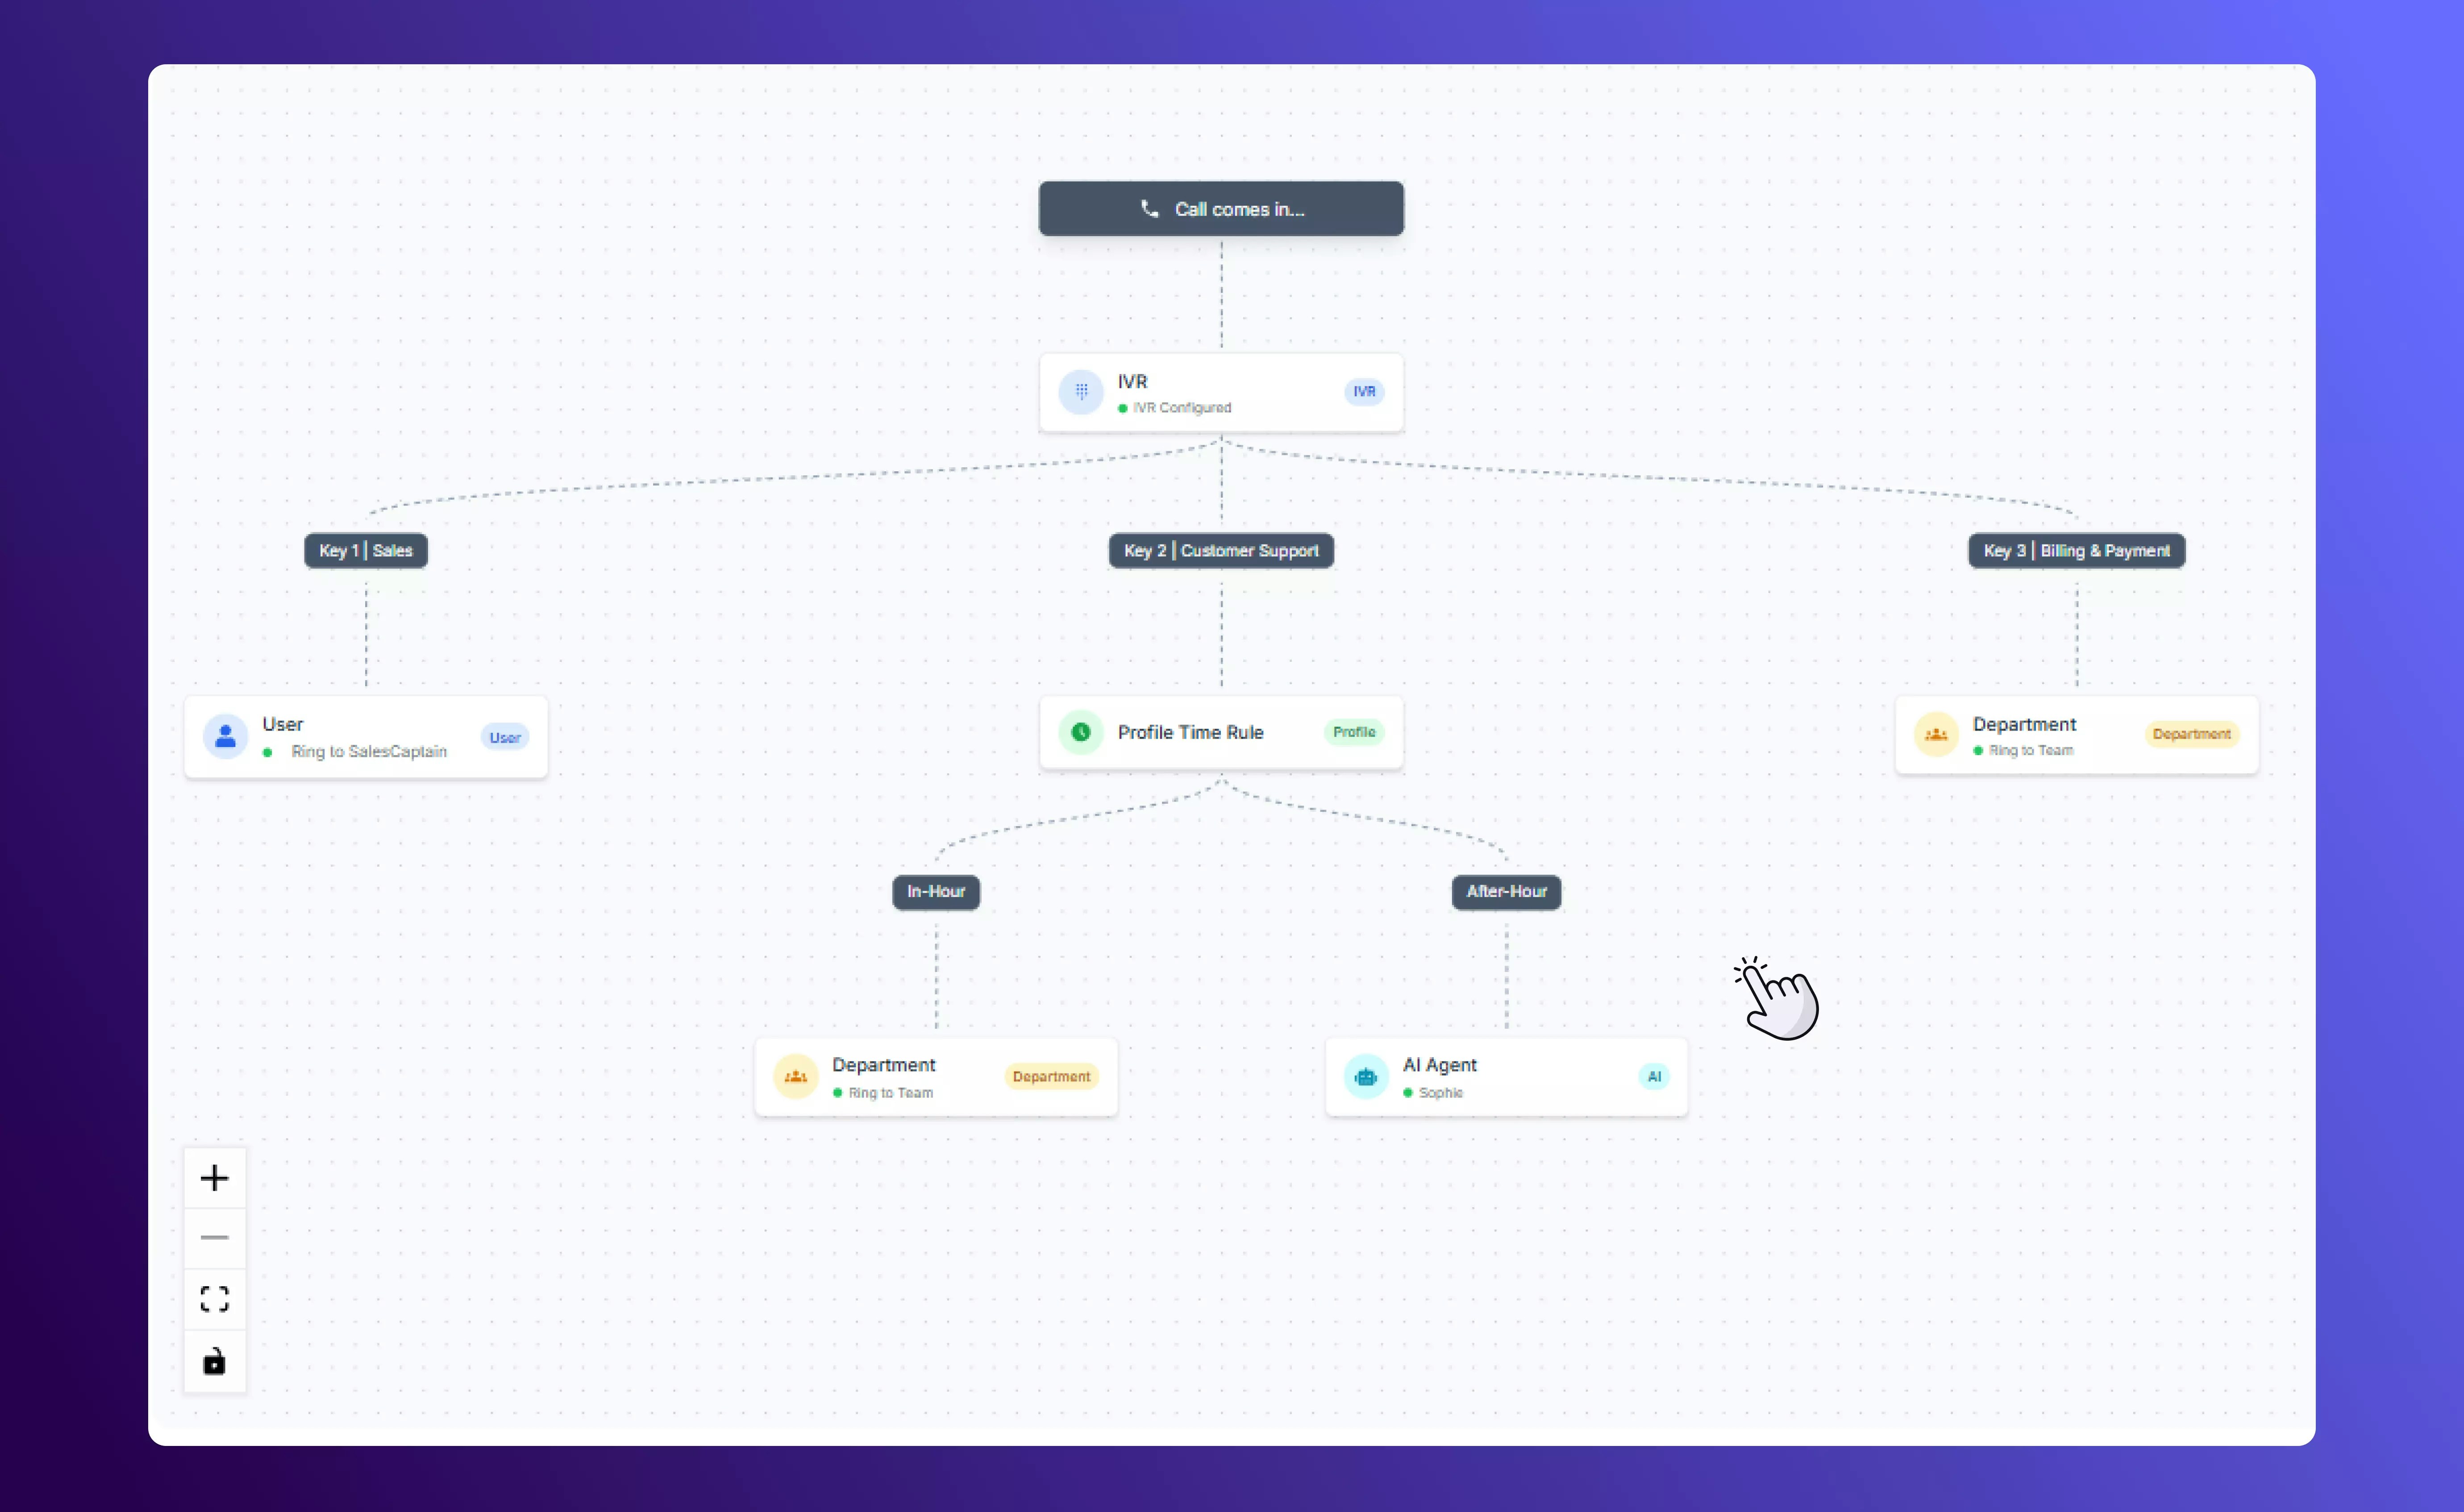
 ## Example Call Flow
Here’s a simple example of how these actions can be combined into a 24/7 automated custom call flow:
## Example Call Flow
Here’s a simple example of how these actions can be combined into a 24/7 automated custom call flow:
 ## Tips to Build Effective Call Flows
* Keep menus short and simple (no more than 3–4 IVR options).
* Use time rules to balance workloads across different teams.
* Add SMS follow-ups to reassure customers if they couldn’t reach you live.
* Test your flow after saving to make sure all branches connect properly.
Call flows ensure your customers always reach the right person, get timely updates, or receive a helpful response. With SalesCaptain’s drag-and-drop builder, you can design flows that fit your business needs: from simple routing to advanced AI-powered customer experiences.
## Tips to Build Effective Call Flows
* Keep menus short and simple (no more than 3–4 IVR options).
* Use time rules to balance workloads across different teams.
* Add SMS follow-ups to reassure customers if they couldn’t reach you live.
* Test your flow after saving to make sure all branches connect properly.
Call flows ensure your customers always reach the right person, get timely updates, or receive a helpful response. With SalesCaptain’s drag-and-drop builder, you can design flows that fit your business needs: from simple routing to advanced AI-powered customer experiences.