> ## Documentation Index
> Fetch the complete documentation index at: https://docs.salescaptain.com/llms.txt
> Use this file to discover all available pages before exploring further.
# Setting Up Your Phone System
> SalesCaptain makes it easy to receive and make business calls from anywhere, whether you’re using the mobile app, desktop, or a physical desk phone. Each option connects directly to your SalesCaptain phone system so all your call flows, recordings, and contacts stay unified in one place.
## **Setting Up on Mobile**
To start receiving calls on your phone through the SalesCaptain mobile app:
1. Open the **SalesCaptain mobile app**.
2. Go to **Settings → Calls**.
3. Turn on **Receive Calls**.
4. When prompted, **grant microphone and call permissions**.
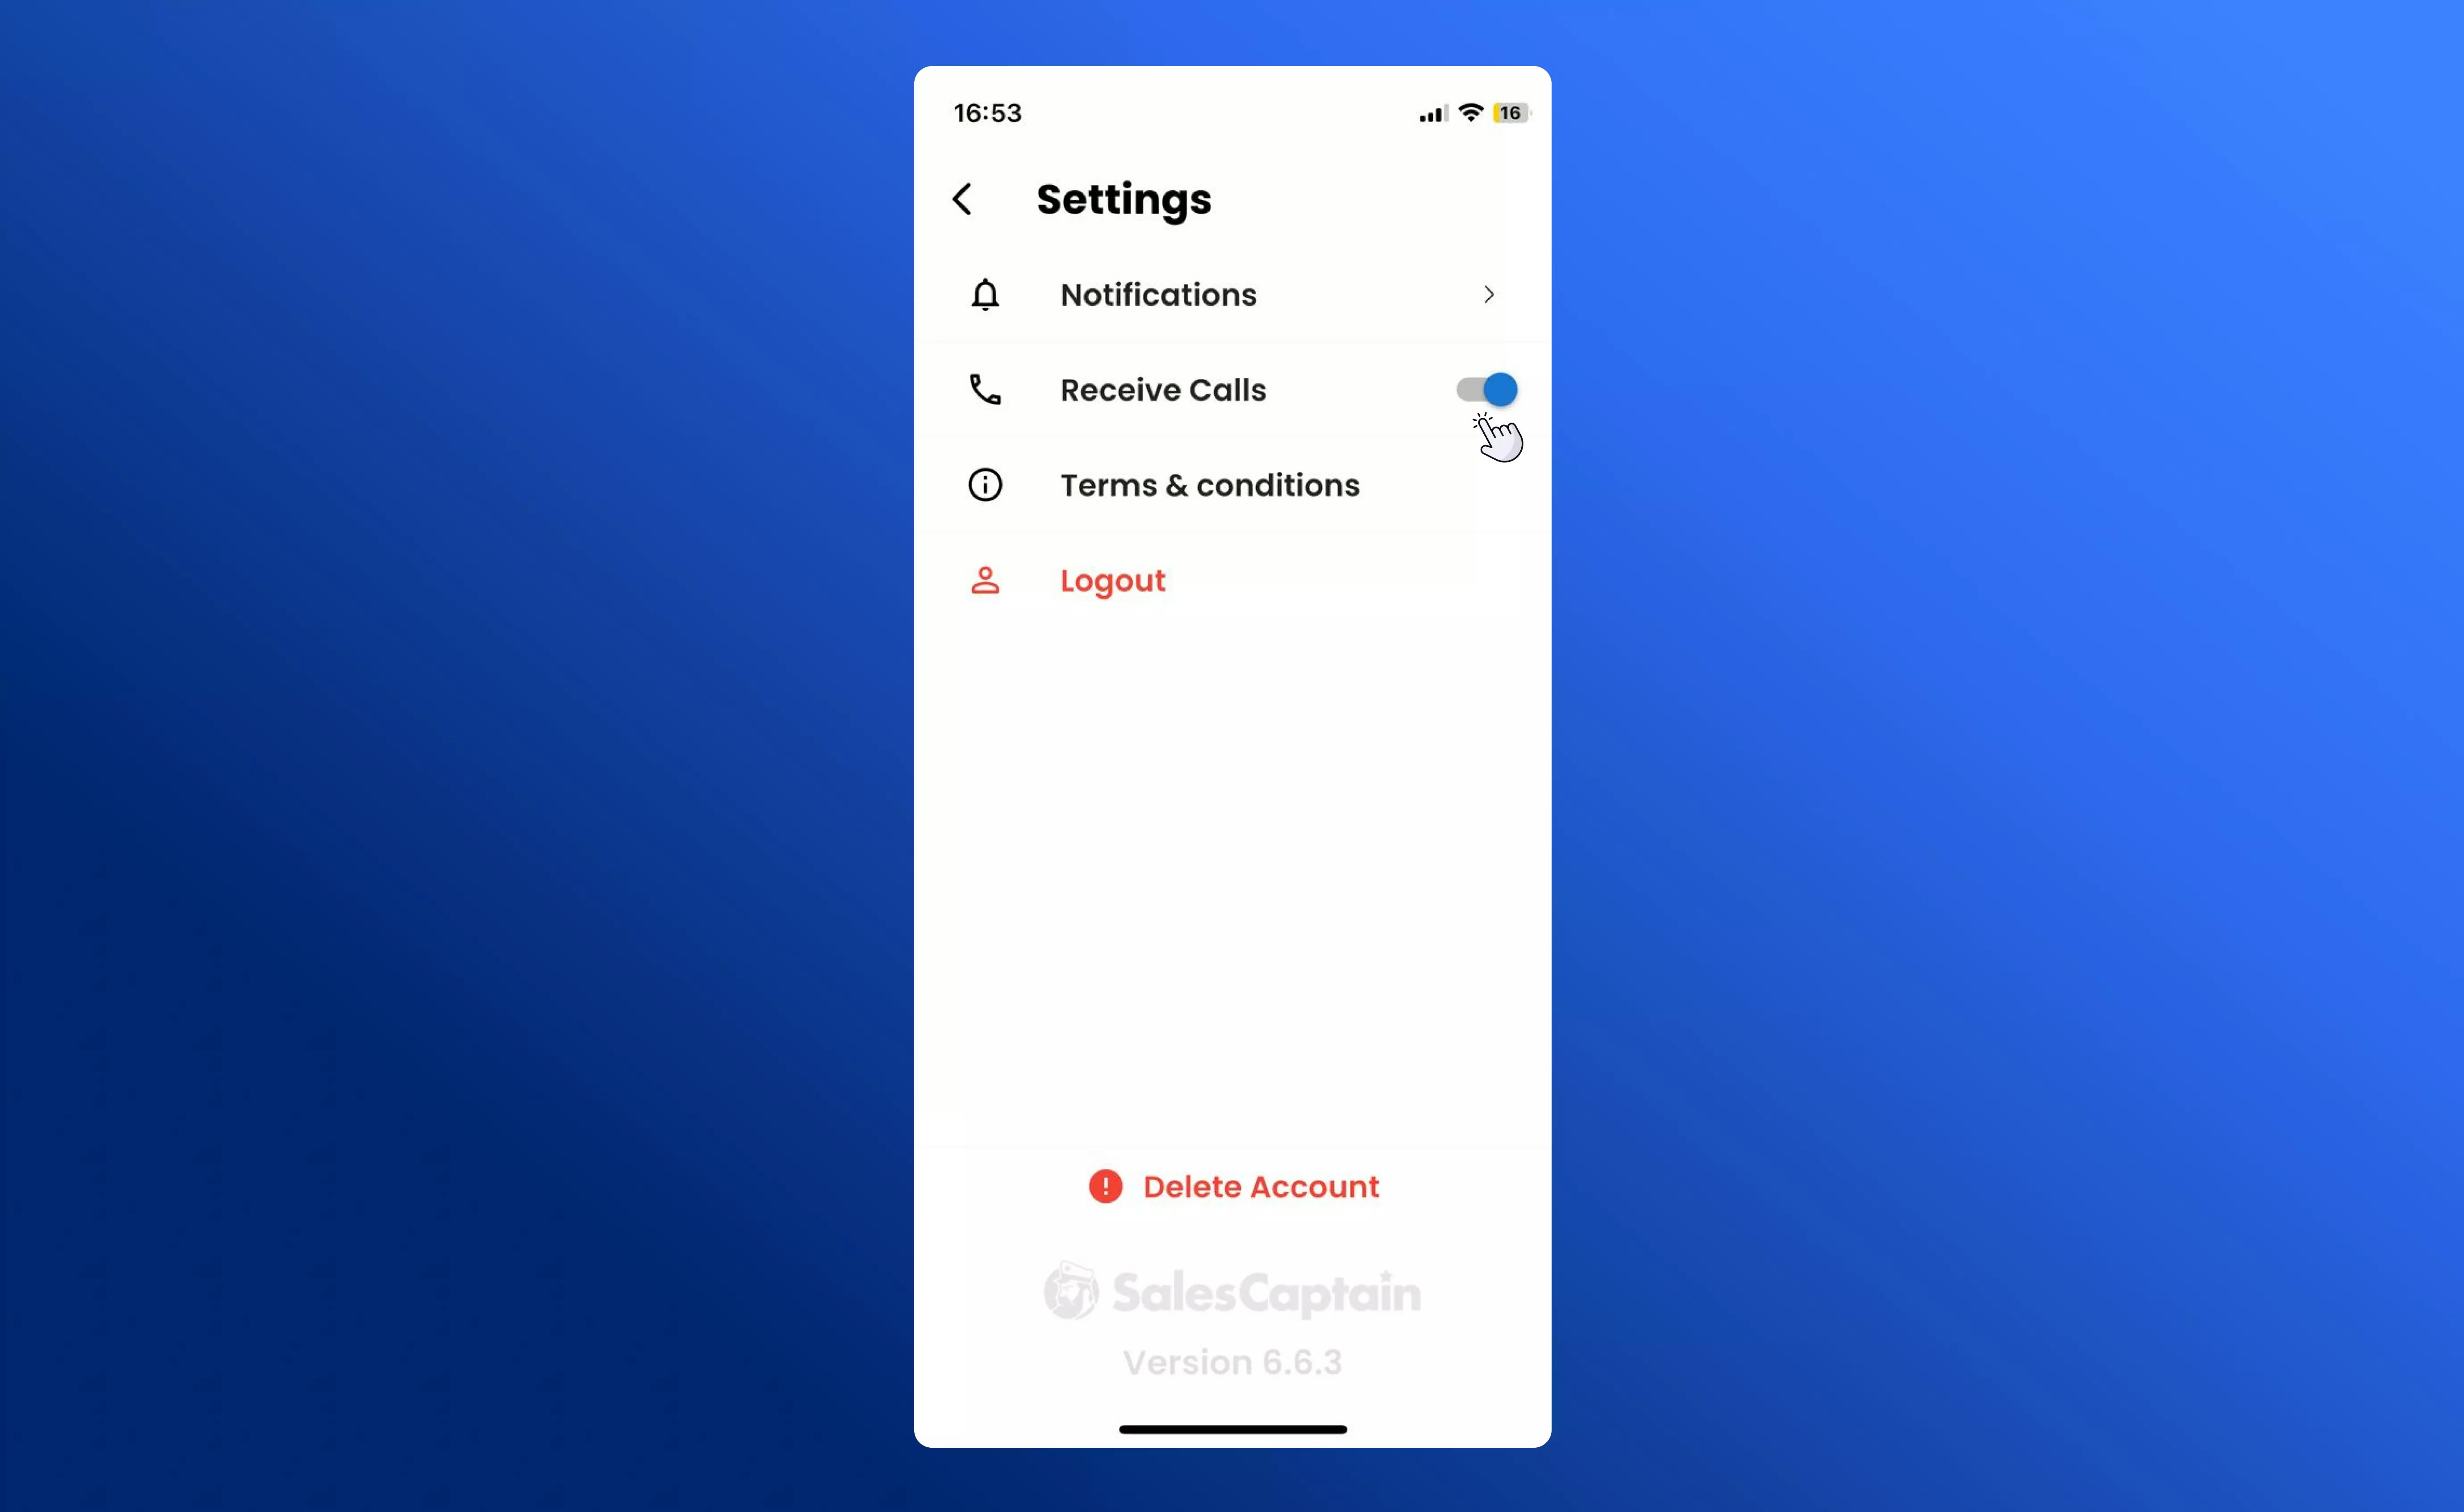 Once enabled, you’ll start receiving incoming calls directly through the app — just like on your business number.
**Tip:** Make sure your device notifications are enabled so you don’t miss any incoming calls.
## **Setting Up on Desktop**
To receive calls on your computer:
1. Log in to your **SalesCaptain web or desktop app**.
2. When you receive your first call or make one, your browser will prompt you for **microphone access**.
3. Click **Allow** when asked for microphone permissions.
Once permission is granted, your computer will automatically be set up for calling. You can answer or place calls directly from your browser tab or desktop window.
## **Setting Up Yealink Deskphones**
With SalesCaptain, you can also connect physical desk phones such as Yealink or Grandstream devices to your business phone system. Once configured, all calls will route through your SalesCaptain account and sync with your call activity automatically.
### **Step 1: Get Your Device’s IP Address**
1. On your Yealink phone, press the **OK** button (or **Menu → Status** on some models).
2. Find the **IPv4 Address** listed on the **Status** page.
3. On a computer connected to the same network, open a web browser and enter your device’s IP address in this format:
```
https://
```
### **Step 2: Log In to the Phone Portal**
When the login page appears:
* Username: **admin**
* Password: **admin**
### **Step 3: Adjust Security Settings**
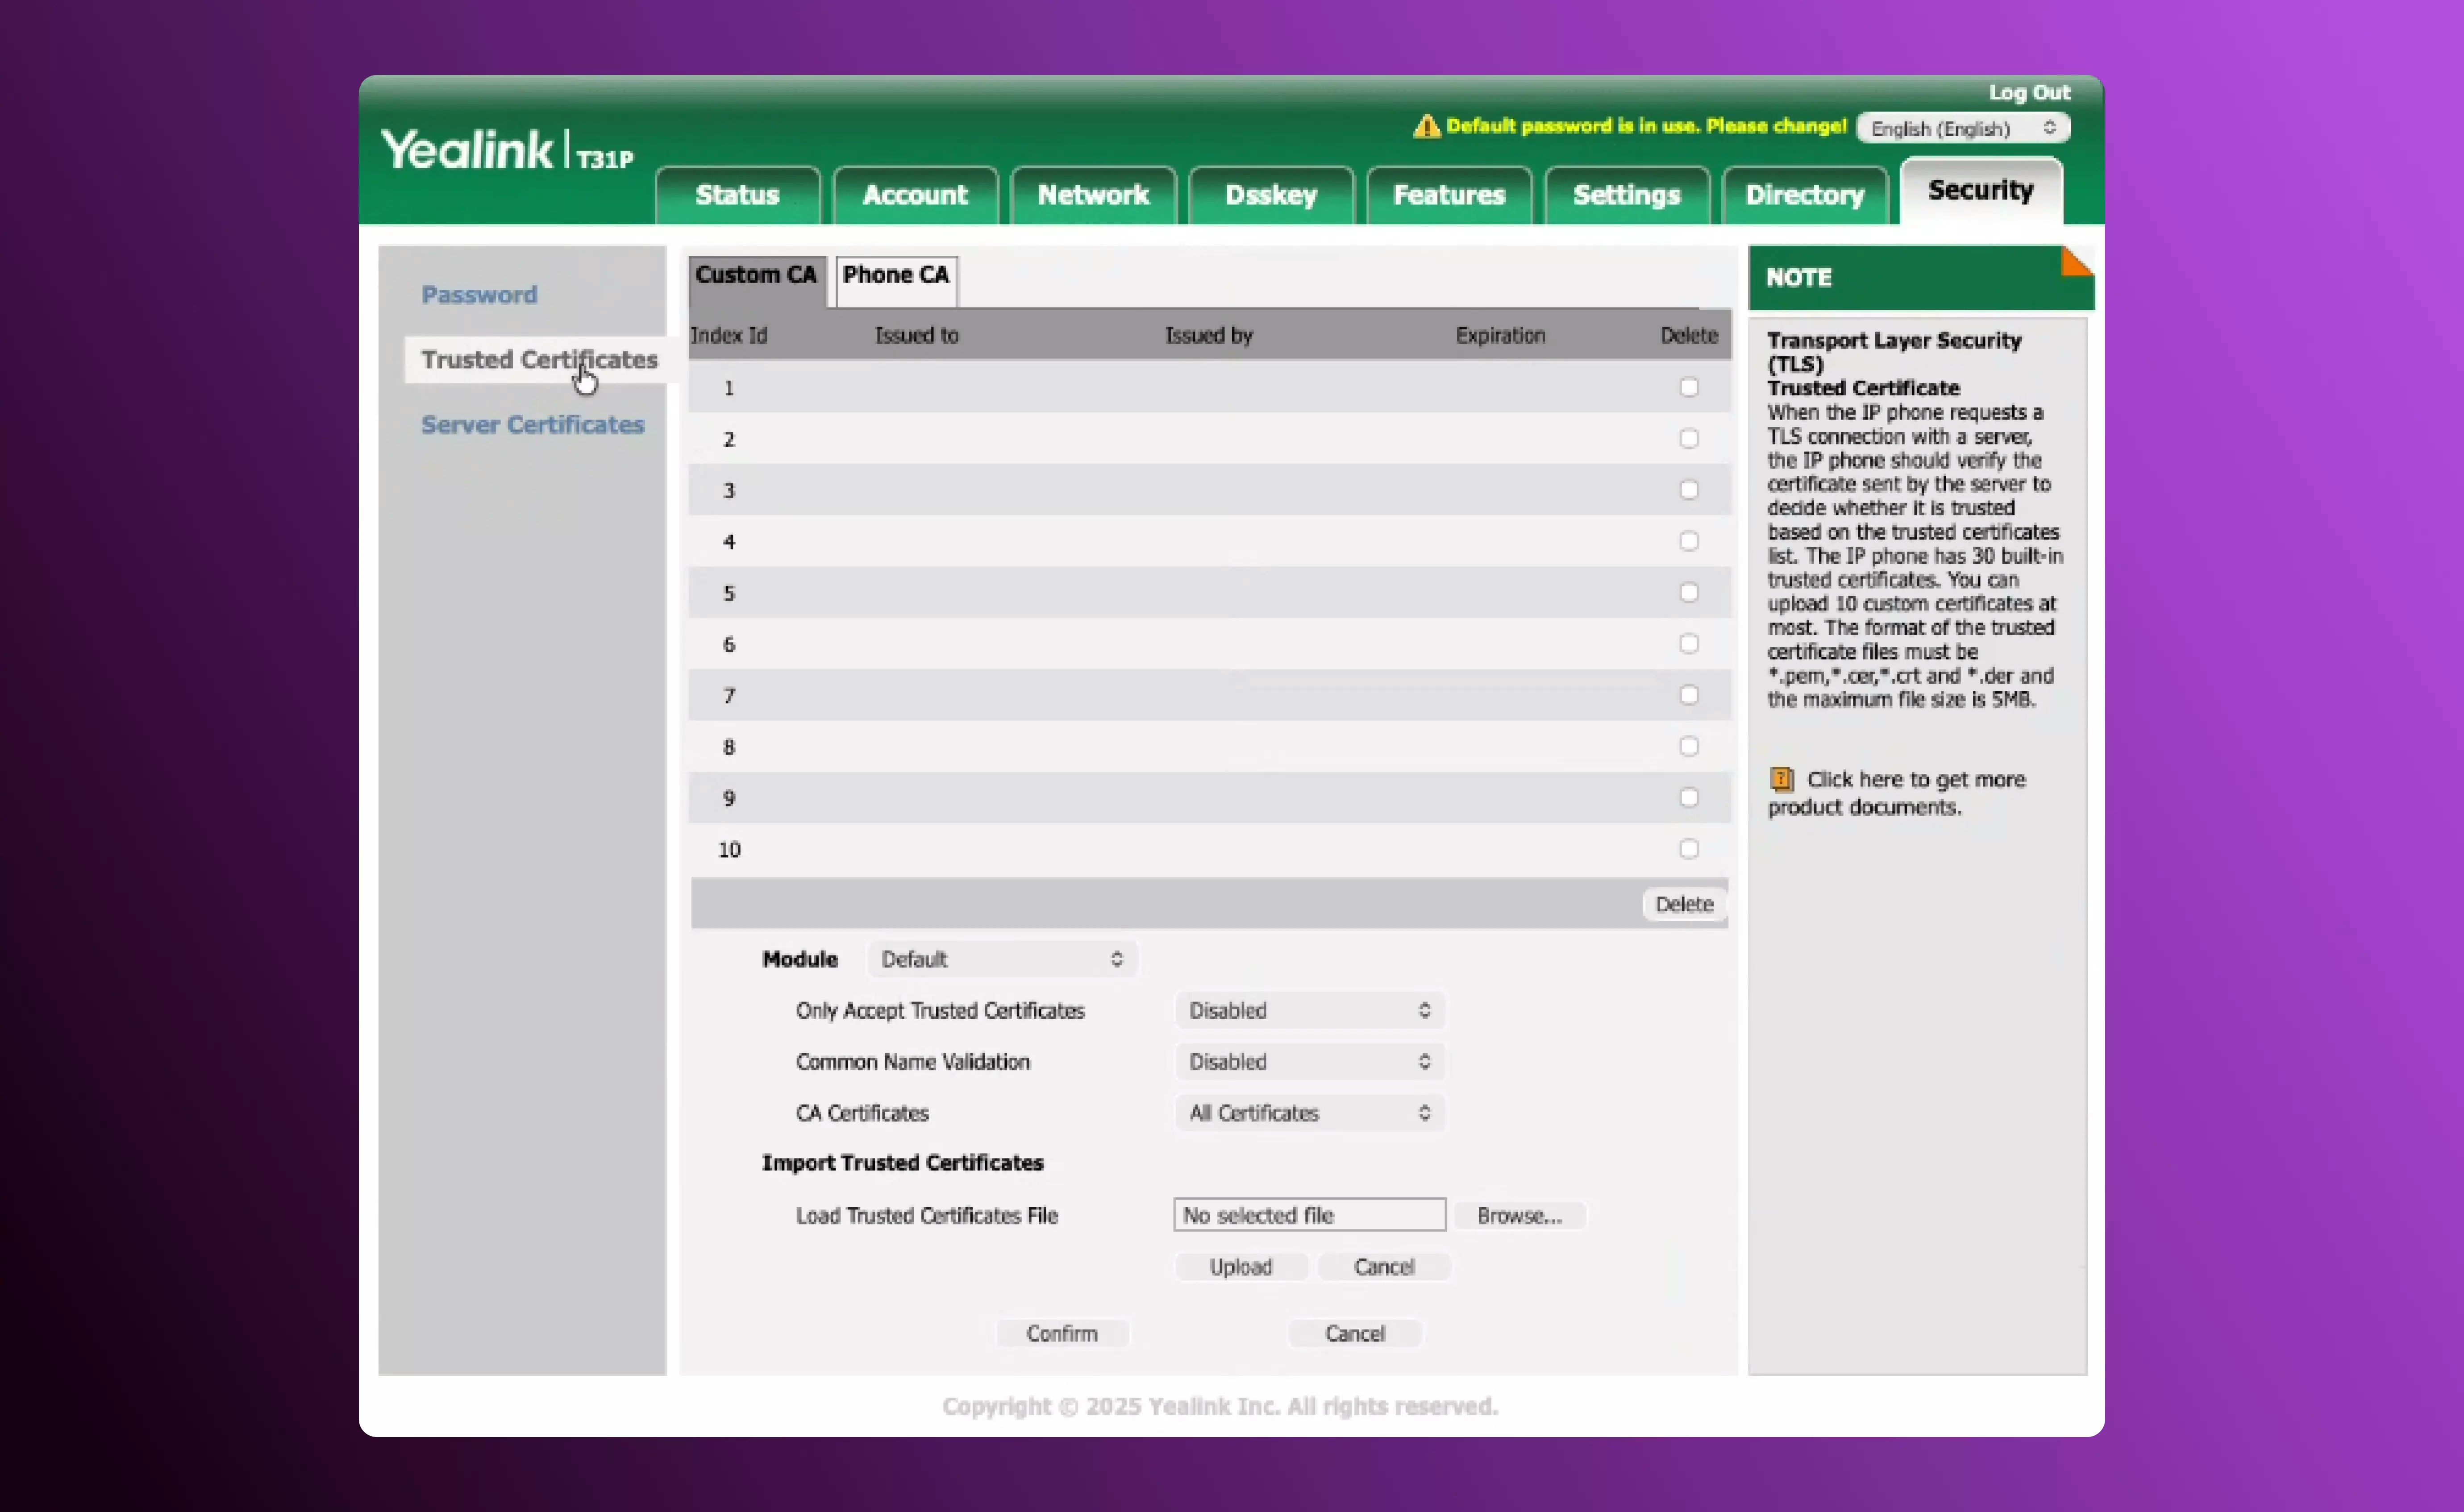
1. Once logged in, navigate to **Security → Trusted Certificates**.
2. Find the option **“Only Accept Trusted Certificates”** and **disable** it.
3. Click **Confirm** to save your changes.
This allows your phone to securely connect to SalesCaptain’s PBX without certificate errors.
Once enabled, you’ll start receiving incoming calls directly through the app — just like on your business number.
**Tip:** Make sure your device notifications are enabled so you don’t miss any incoming calls.
## **Setting Up on Desktop**
To receive calls on your computer:
1. Log in to your **SalesCaptain web or desktop app**.
2. When you receive your first call or make one, your browser will prompt you for **microphone access**.
3. Click **Allow** when asked for microphone permissions.
Once permission is granted, your computer will automatically be set up for calling. You can answer or place calls directly from your browser tab or desktop window.
## **Setting Up Yealink Deskphones**
With SalesCaptain, you can also connect physical desk phones such as Yealink or Grandstream devices to your business phone system. Once configured, all calls will route through your SalesCaptain account and sync with your call activity automatically.
### **Step 1: Get Your Device’s IP Address**
1. On your Yealink phone, press the **OK** button (or **Menu → Status** on some models).
2. Find the **IPv4 Address** listed on the **Status** page.
3. On a computer connected to the same network, open a web browser and enter your device’s IP address in this format:
```
https://
```
### **Step 2: Log In to the Phone Portal**
When the login page appears:
* Username: **admin**
* Password: **admin**
### **Step 3: Adjust Security Settings**
1. Once logged in, navigate to **Security → Trusted Certificates**.
2. Find the option **“Only Accept Trusted Certificates”** and **disable** it.
3. Click **Confirm** to save your changes.
This allows your phone to securely connect to SalesCaptain’s PBX without certificate errors.
 ### **Step 4: Configure SIP Account Registration**
Navigate to **Account → Register** and fill in the fields as follows:
| **Field** | **What to Enter** |
| :------------------------------- | :--------------------------------------------------------- |
| **Label** | Any name (e.g., *SalesCaptain Line*) |
| **Display Name** | Any name (same as above or your extension name) |
| **Register Name** | Your extension (from SalesCaptain) |
| **Username** | Same as your extension (from SalesCaptain) |
| **Password** | The password shown in SalesCaptain after saving the device |
| **Server Host / SIP Server** | *Company SIP info (will appear soon in SalesCaptain)* |
| **Outbound Proxy Server 1** | [pbx.sc.com](http://pbx.sc.com) |
| **Enable Outbound Proxy Server** | Yes |
| **Transport** | TLS |
| **Port** | 5061 |
Here's an example of what this page would look like with all the fields filled in correctly:
### **Step 4: Configure SIP Account Registration**
Navigate to **Account → Register** and fill in the fields as follows:
| **Field** | **What to Enter** |
| :------------------------------- | :--------------------------------------------------------- |
| **Label** | Any name (e.g., *SalesCaptain Line*) |
| **Display Name** | Any name (same as above or your extension name) |
| **Register Name** | Your extension (from SalesCaptain) |
| **Username** | Same as your extension (from SalesCaptain) |
| **Password** | The password shown in SalesCaptain after saving the device |
| **Server Host / SIP Server** | *Company SIP info (will appear soon in SalesCaptain)* |
| **Outbound Proxy Server 1** | [pbx.sc.com](http://pbx.sc.com) |
| **Enable Outbound Proxy Server** | Yes |
| **Transport** | TLS |
| **Port** | 5061 |
Here's an example of what this page would look like with all the fields filled in correctly:
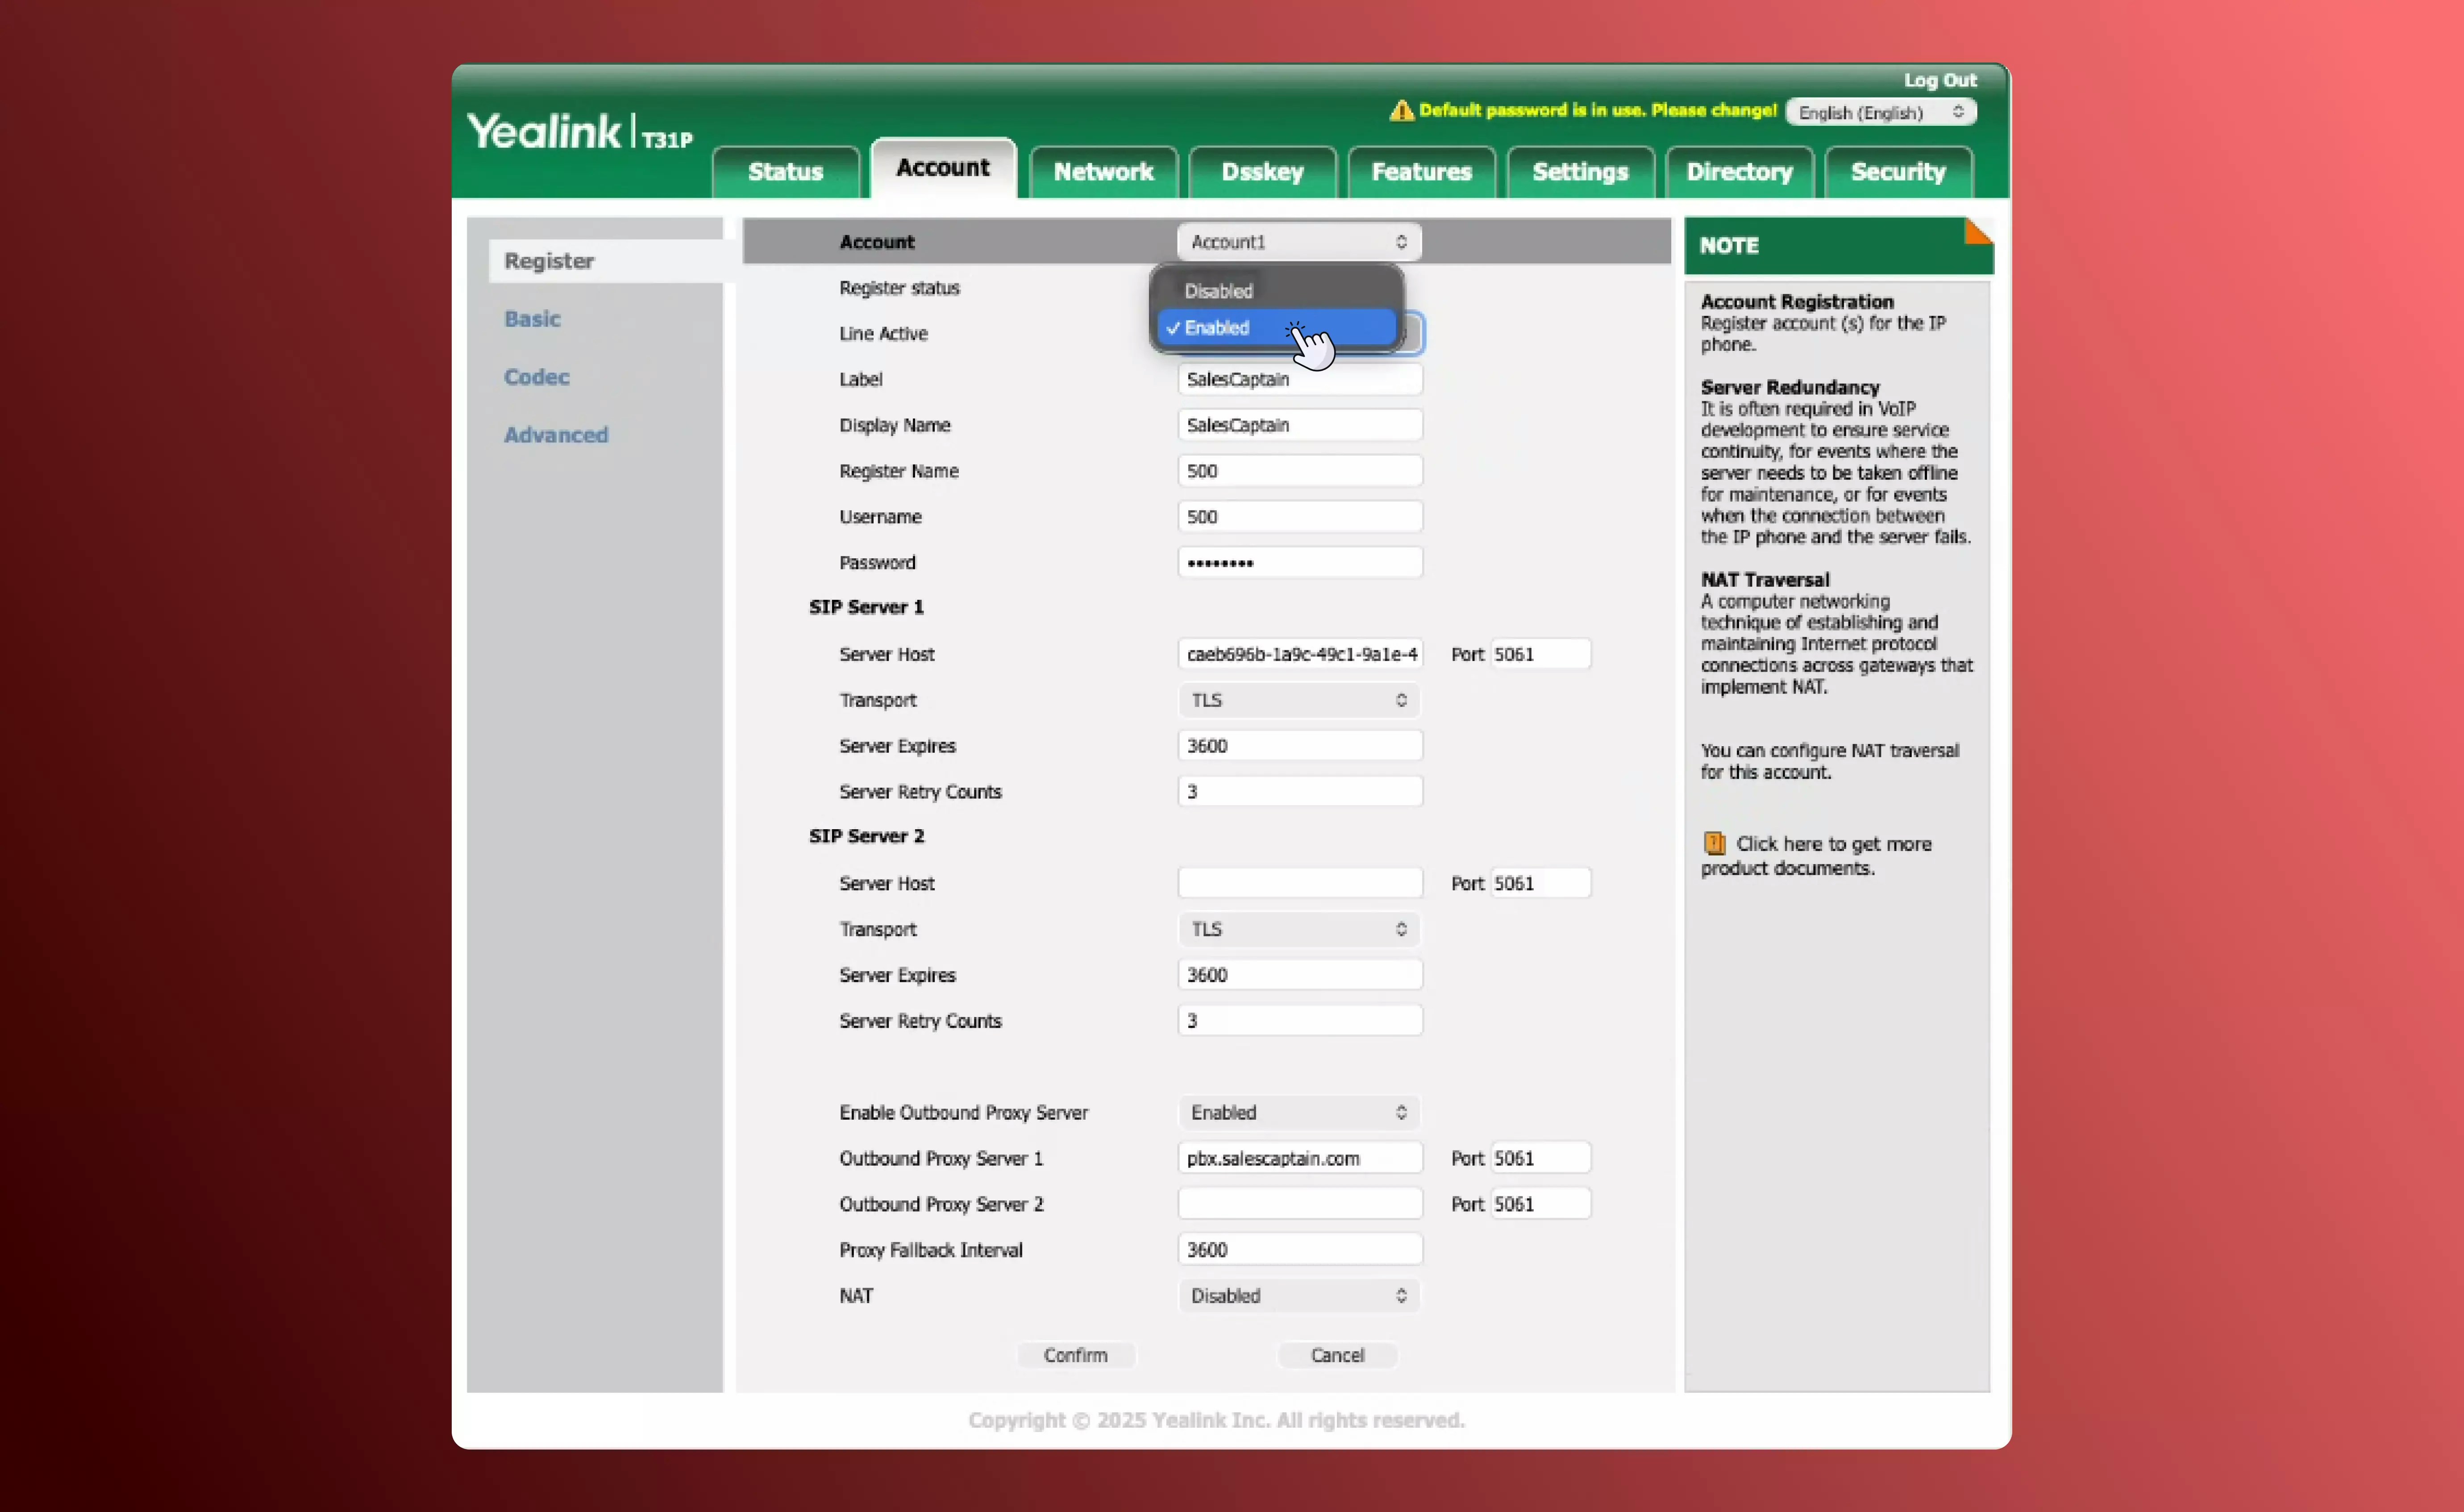 **Tip:** Ensure that every transport and port setting is set to **TLS** and **5061** respectively.
### **Step 5: Save and Reboot**
1. Click **Confirm** or **Save** on the Account page.
2. Reboot the device to apply the new configuration.
3. Once restarted, your new hardphone and other connected devices can be found in your SalesCaptain dashboard by navigating to **Settings → Calls → Extensions and Groups**.
You’re now ready to receive and make calls through SalesCaptain using your Yealink phone.
## **Troubleshooting Registration Issues**
If your phone shows **Not Registered** or fails to connect, try the following:
1. **Verify Credentials:**\
Double-check that the **Register Name**, **Username**, and **Password** match the device credentials in SalesCaptain.
2. **Check Transport and Port:**\
Confirm that **Transport** is set to **TLS** and **Port** is **5061** everywhere.
3. **Reboot the Phone and Router:**\
Network cache issues can occasionally prevent registration. A full reboot often resolves this.
4. **Firewall or Network Blocks:**\
Make sure your network allows outbound traffic on port **5061**.
5. **Certificate Error:**\
Revisit **Security → Trusted Certificates** and ensure **“Only Accept Trusted Certificates”** is **disabled**.
6. **Reset and Reconfigure:**\
As a last step, you can factory-reset the phone and re-enter all SIP details carefully.
**Still not connecting?**\
Contact SalesCaptain Support and share a screenshot of your **Account Registration** page for faster assistance.
**Tip:** Ensure that every transport and port setting is set to **TLS** and **5061** respectively.
### **Step 5: Save and Reboot**
1. Click **Confirm** or **Save** on the Account page.
2. Reboot the device to apply the new configuration.
3. Once restarted, your new hardphone and other connected devices can be found in your SalesCaptain dashboard by navigating to **Settings → Calls → Extensions and Groups**.
You’re now ready to receive and make calls through SalesCaptain using your Yealink phone.
## **Troubleshooting Registration Issues**
If your phone shows **Not Registered** or fails to connect, try the following:
1. **Verify Credentials:**\
Double-check that the **Register Name**, **Username**, and **Password** match the device credentials in SalesCaptain.
2. **Check Transport and Port:**\
Confirm that **Transport** is set to **TLS** and **Port** is **5061** everywhere.
3. **Reboot the Phone and Router:**\
Network cache issues can occasionally prevent registration. A full reboot often resolves this.
4. **Firewall or Network Blocks:**\
Make sure your network allows outbound traffic on port **5061**.
5. **Certificate Error:**\
Revisit **Security → Trusted Certificates** and ensure **“Only Accept Trusted Certificates”** is **disabled**.
6. **Reset and Reconfigure:**\
As a last step, you can factory-reset the phone and re-enter all SIP details carefully.
**Still not connecting?**\
Contact SalesCaptain Support and share a screenshot of your **Account Registration** page for faster assistance.